Free Books

Think Python

Python for Data Analysis


Small Python Projects


The Quick Python Book

Python Beyond the Basics

Clean Code in Python
CheatSheets
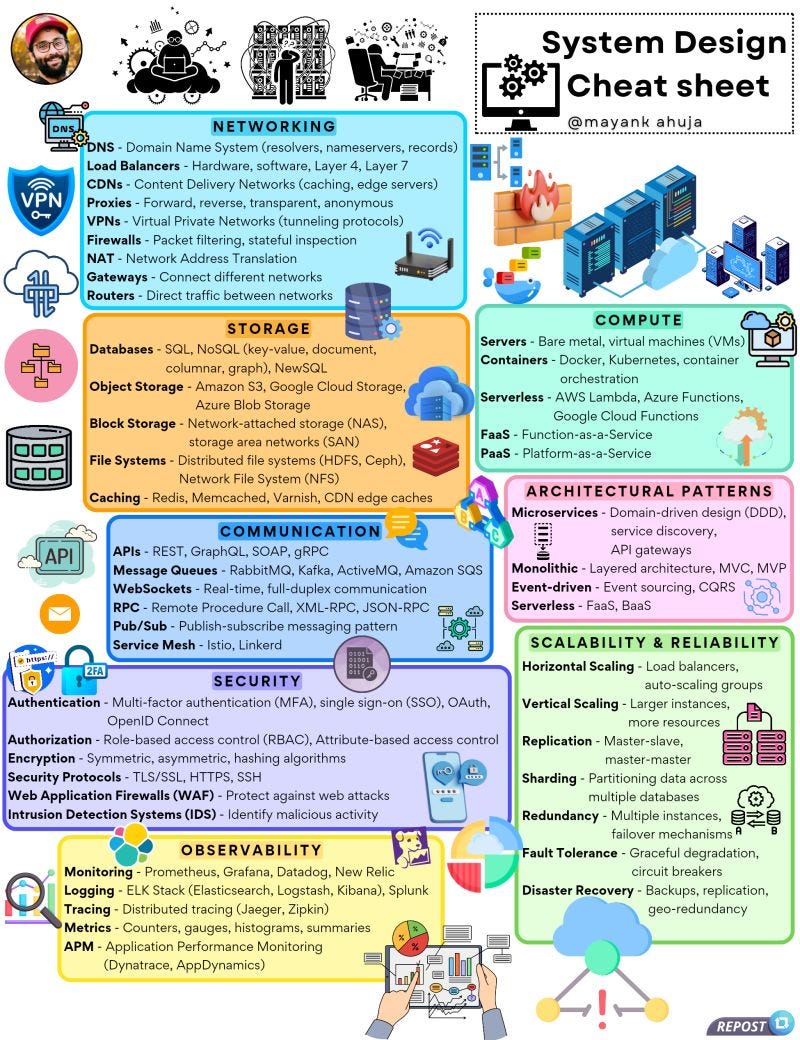
System Design Cheat Sheet
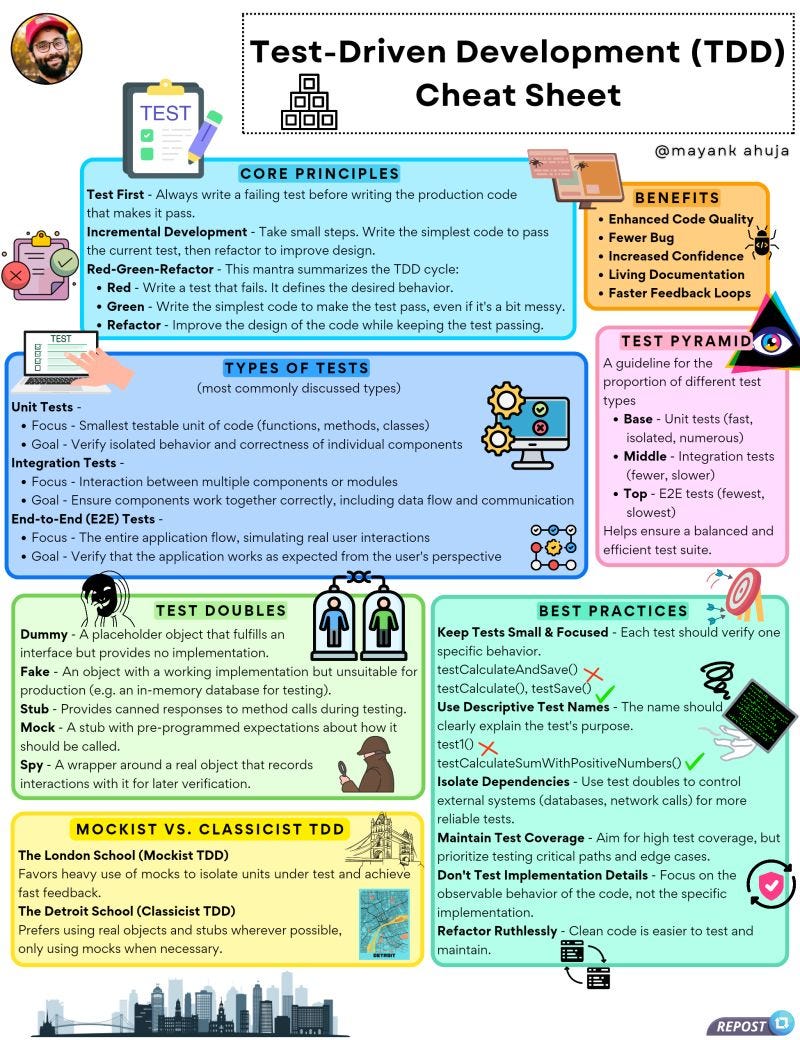
Test-Driven Development (TDD) Cheat Sheet
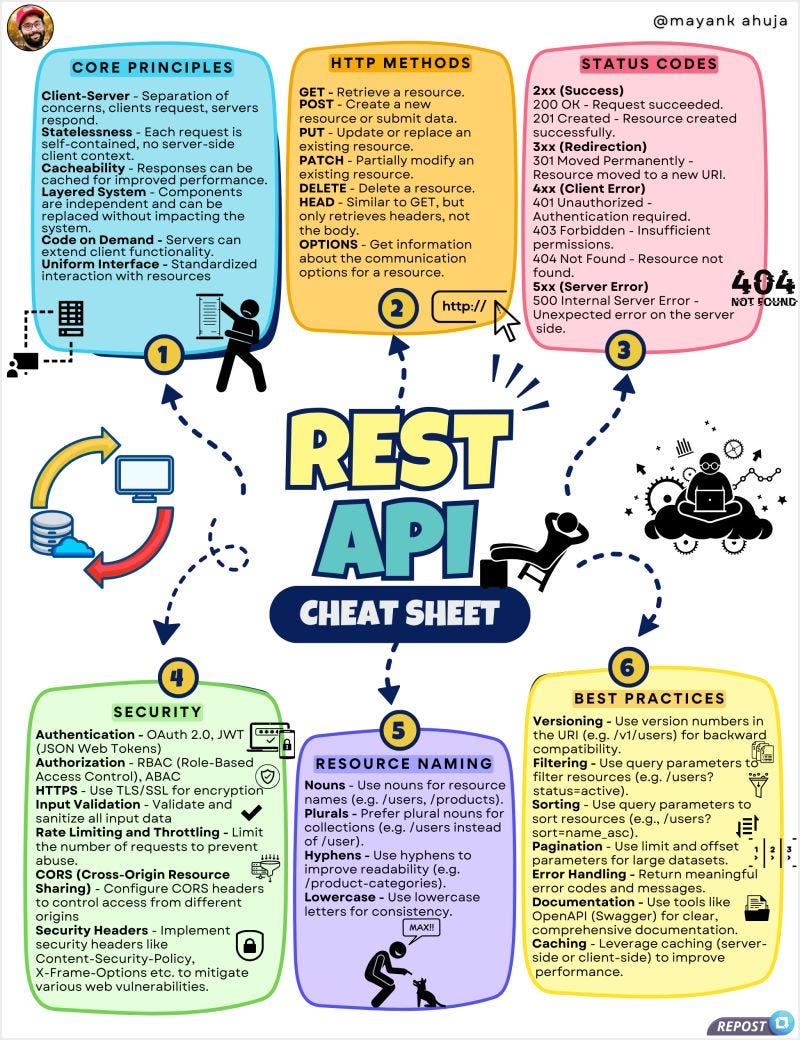
REST API Cheat Sheet
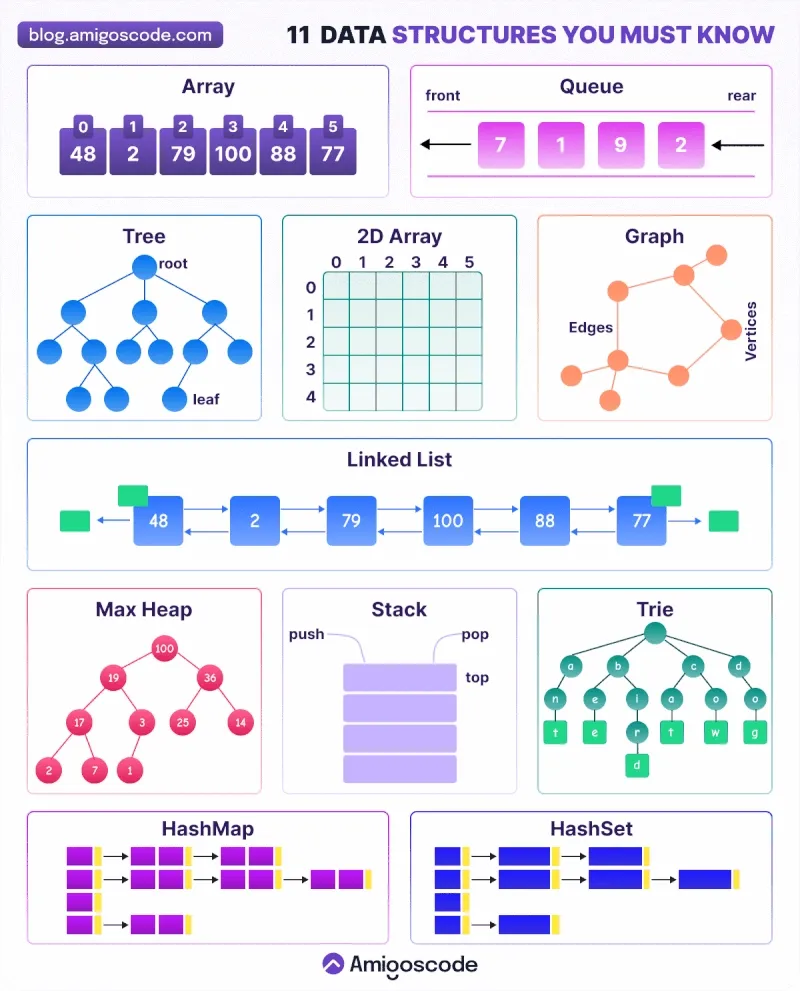
11 Data Structures You Must Know

9 HTTP Methods
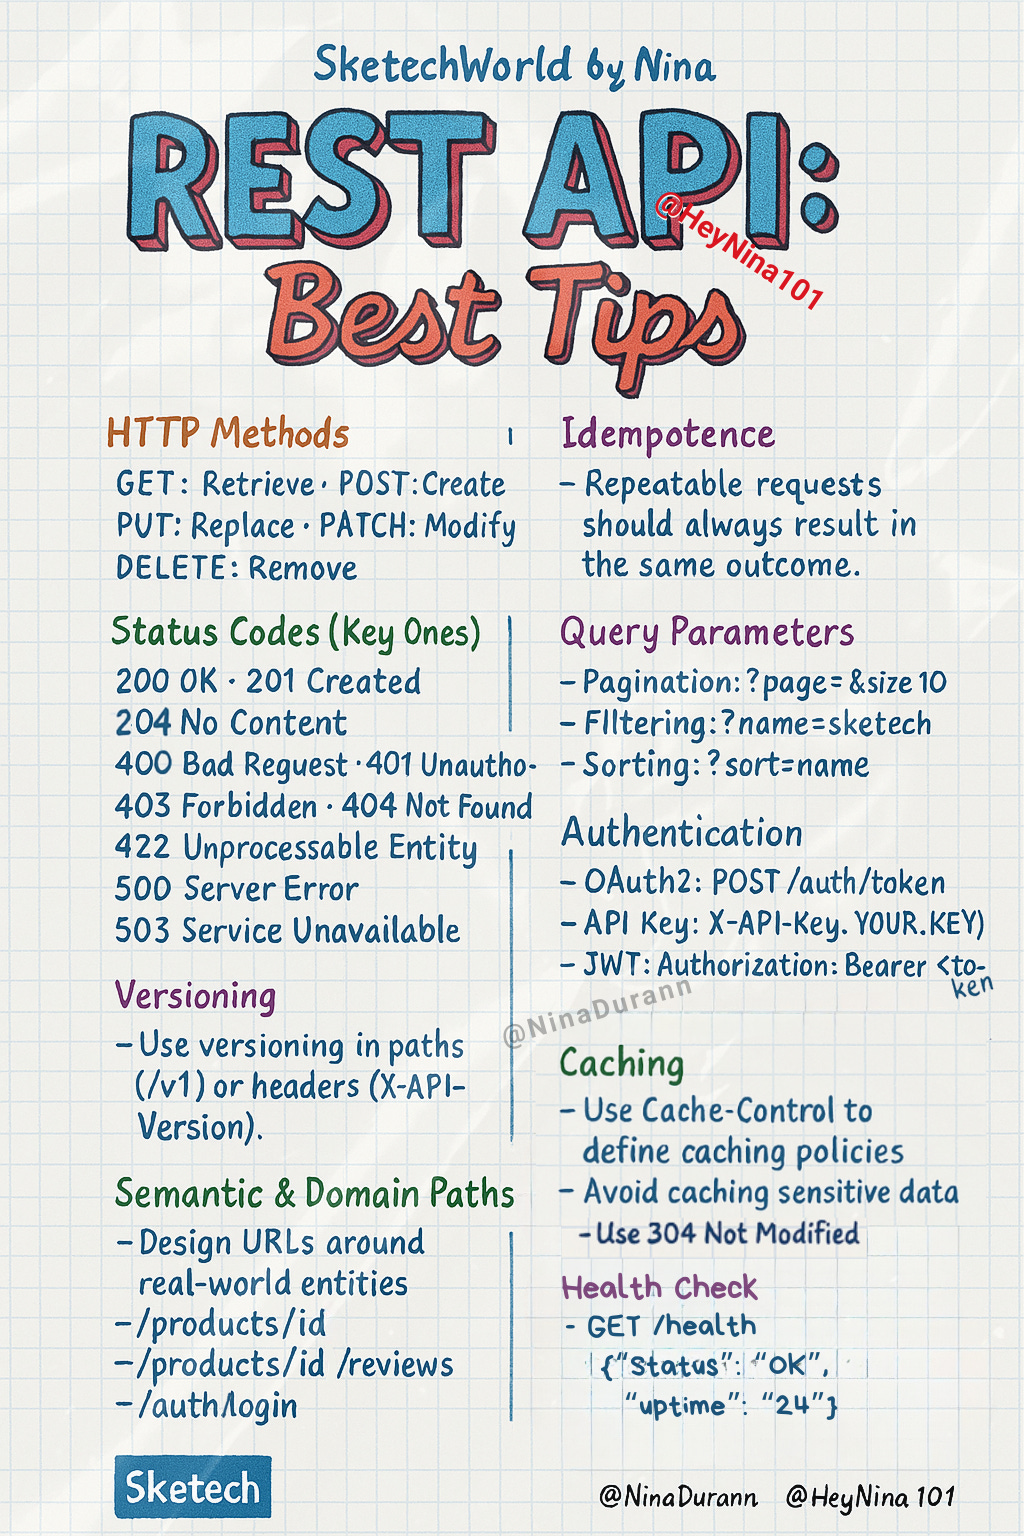
REST API Best Tips
Database Caching
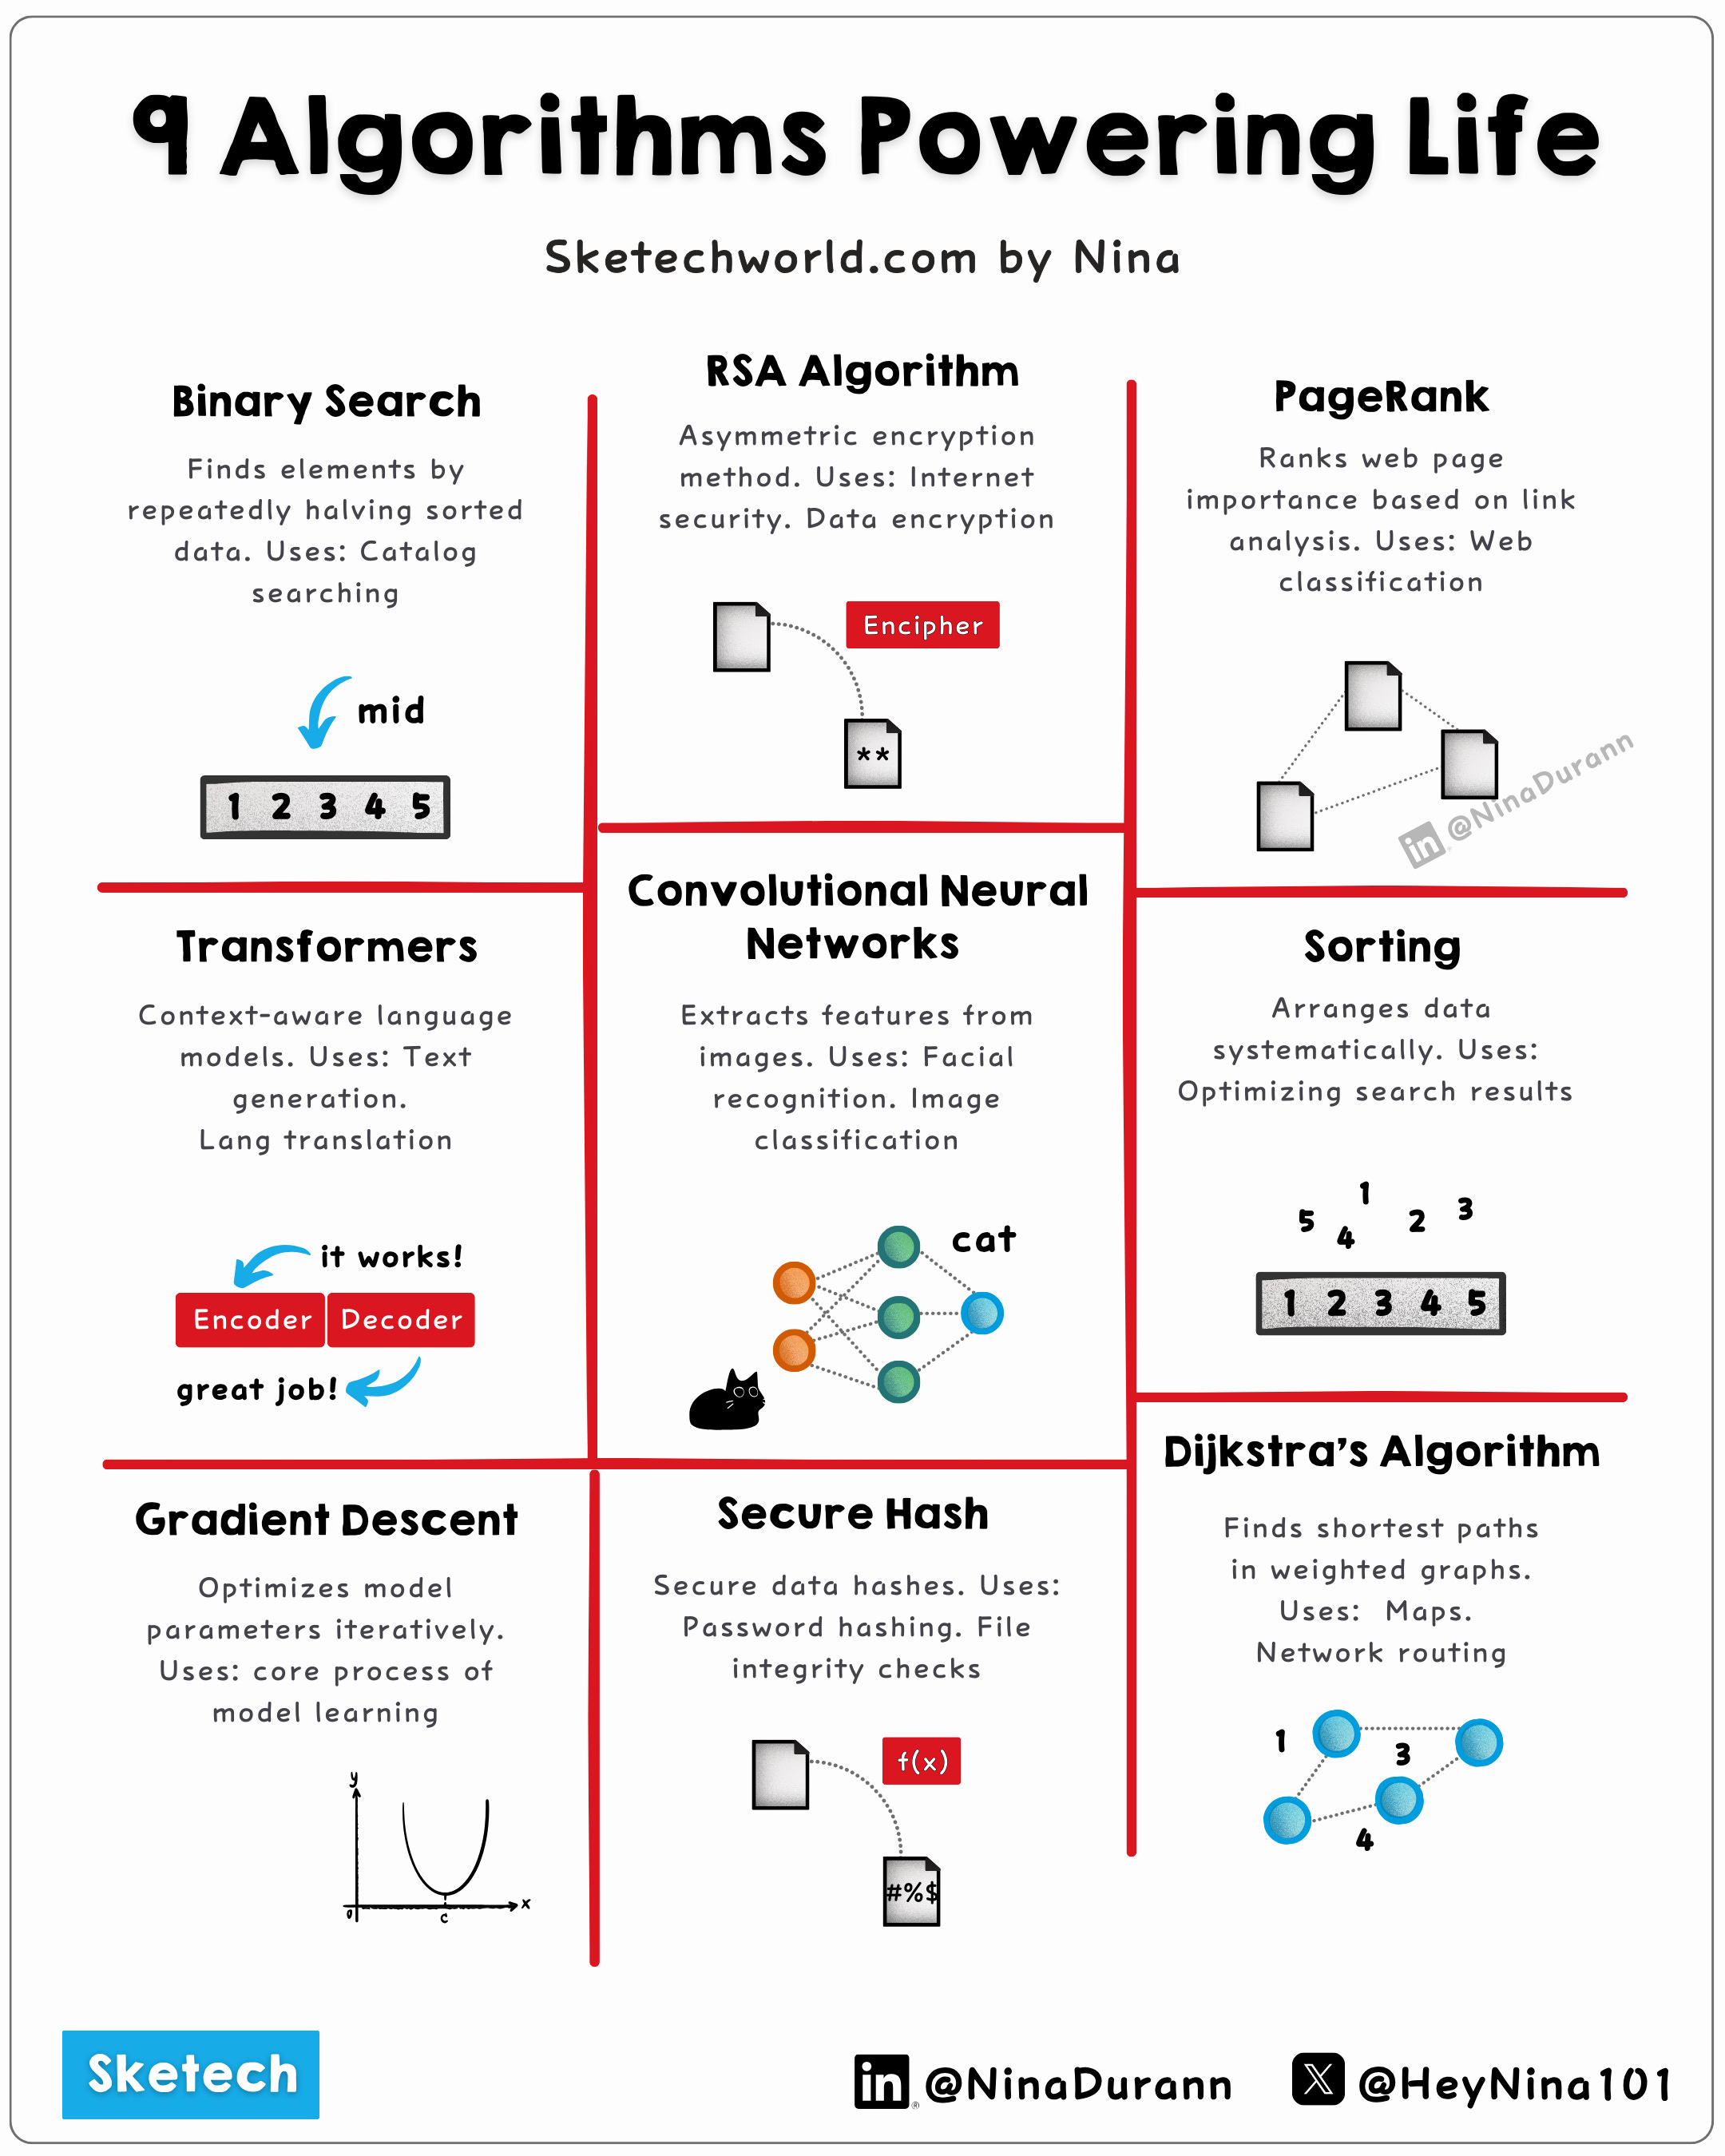
9 Algorithms Powering Life
API Architectural Styles
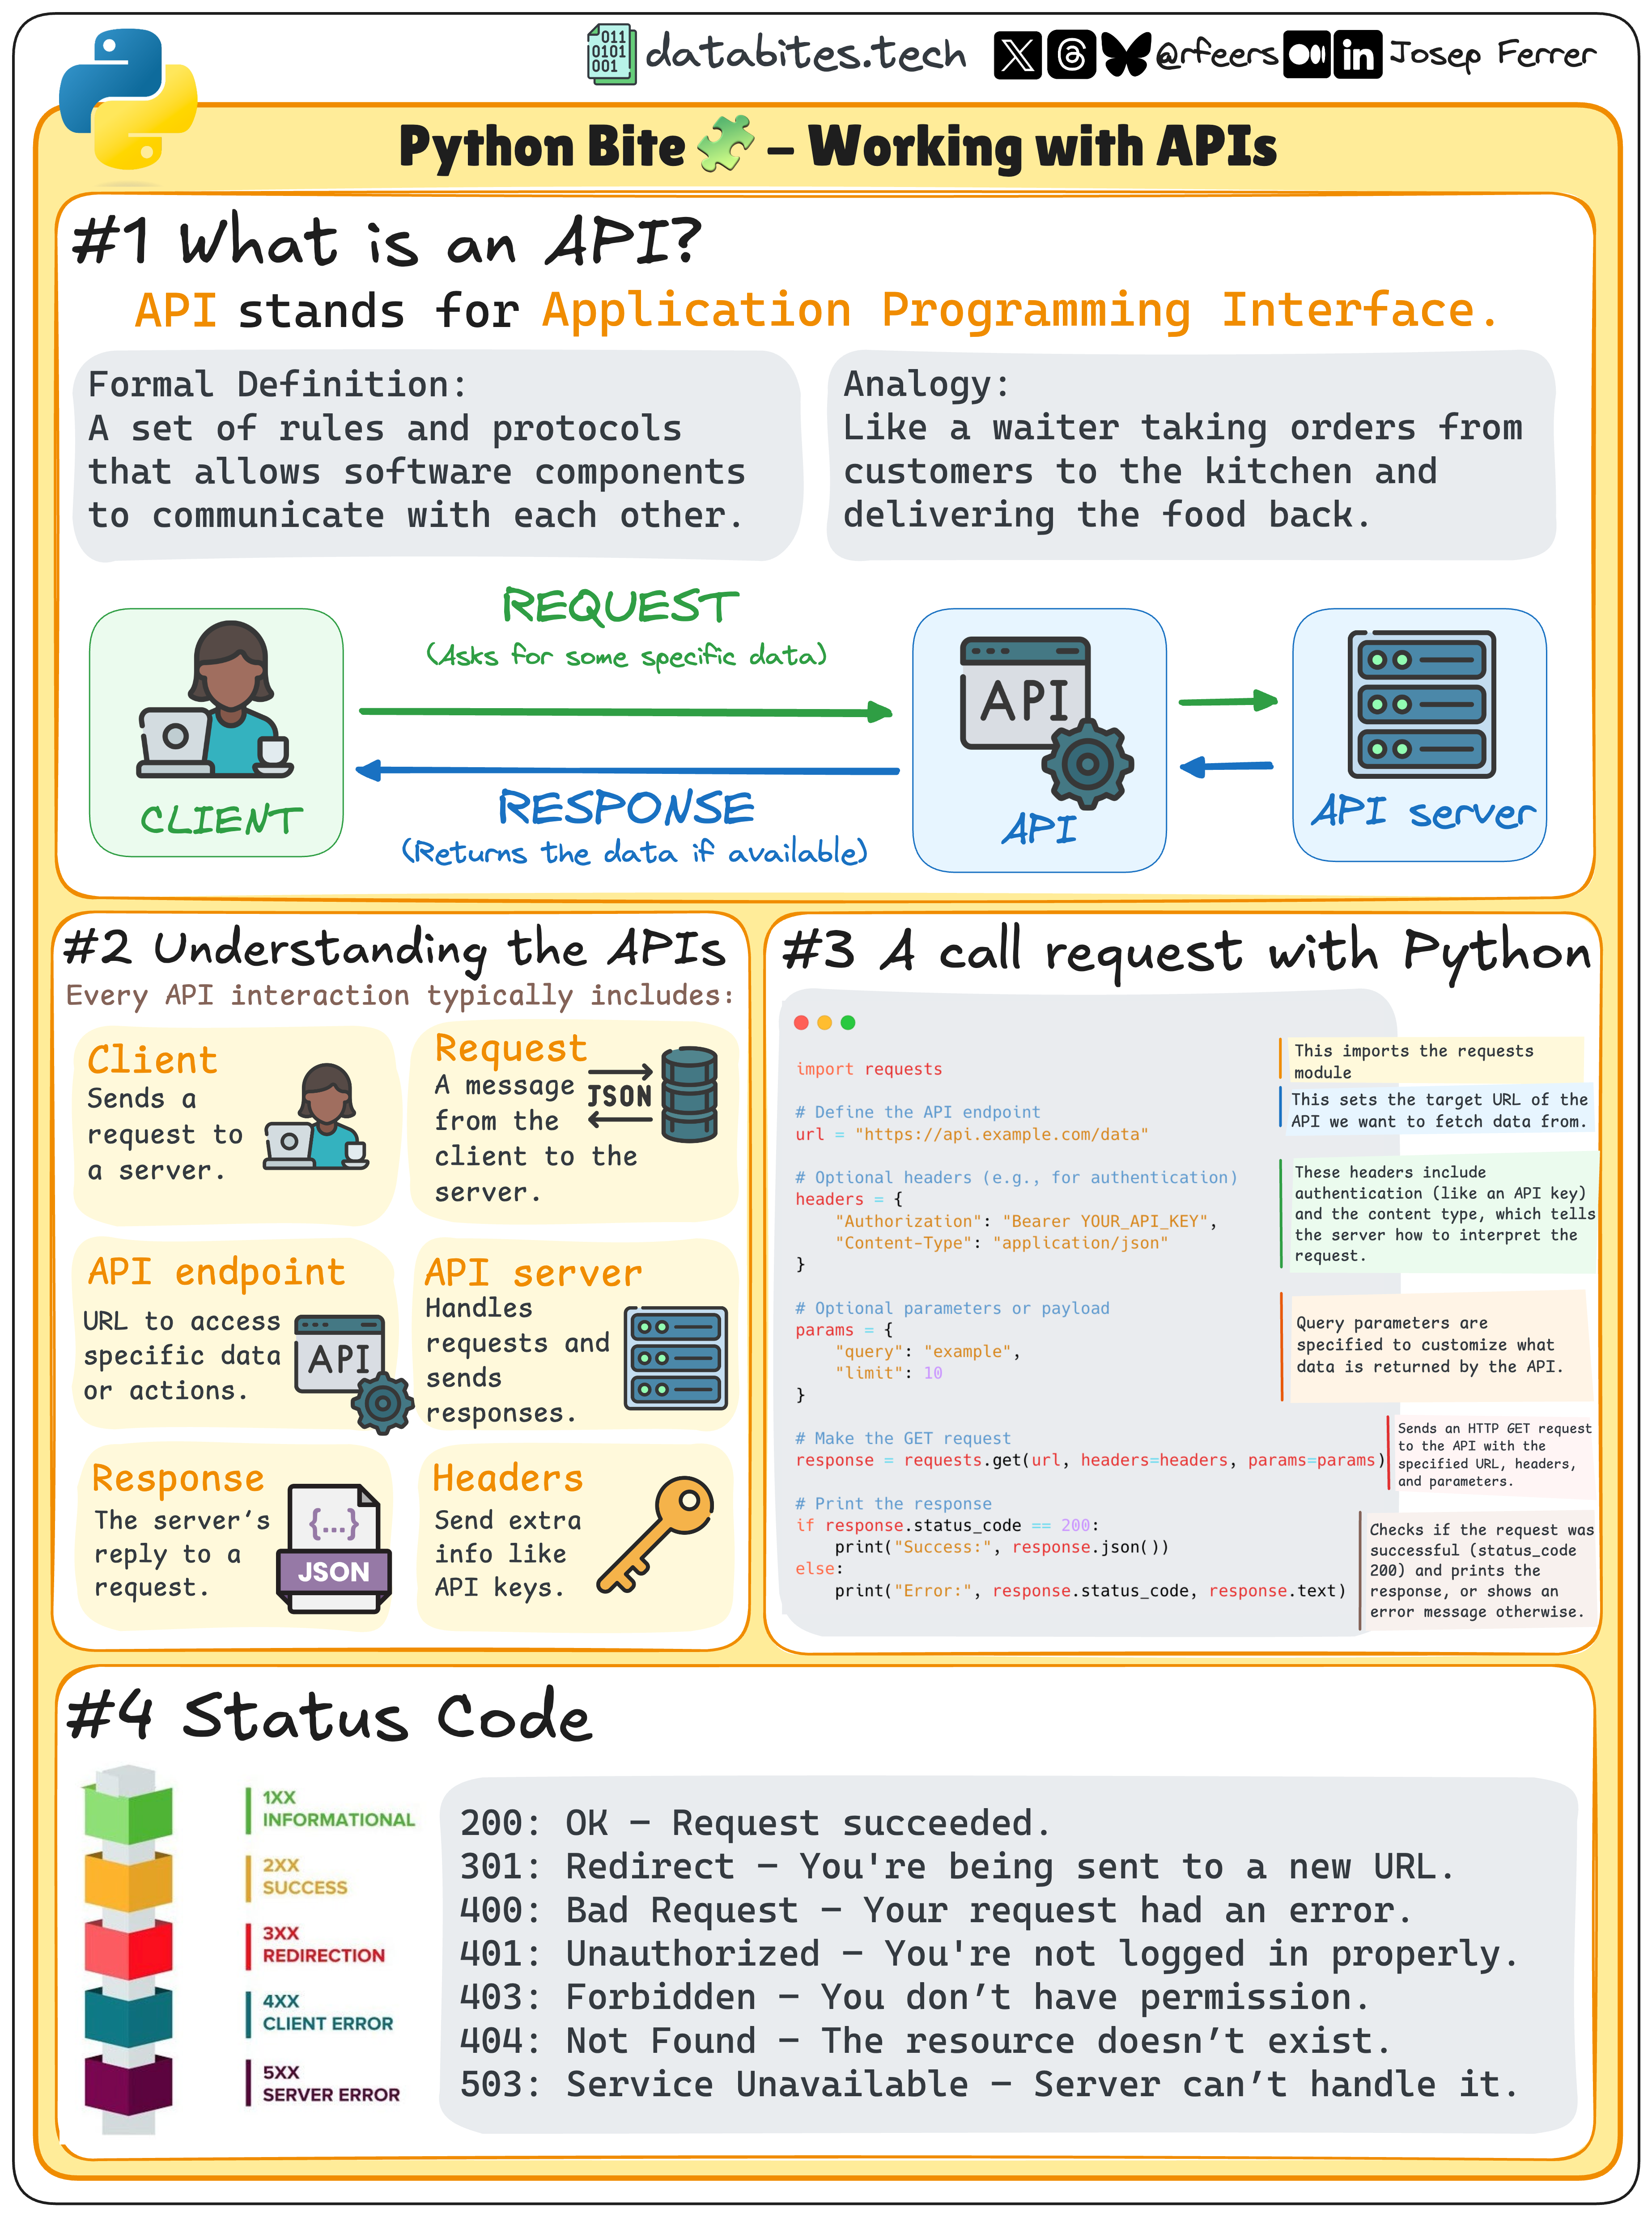
Python Bite, Working with APIs

What's New In Dev World
🚀 Stay Ahead of the Curve! Dive into the freshest trends, tools, and updates shaking up the development world. From Python 🐍 to Angular ⚙️, React 🔥, JavaScript 🌟, TypeScript 🚀, Laravel 🎉, and PHP 🐘—we've got the scoop to keep your skills razor-sharp and your projects cutting-edge!
Life is Too Short, Start Vibe Coding Effectively!
➤ Read Full Article
10xDev Newsletter #1
➤ Read Full Article
Angular 19: A Detailed Guide to New Features
➤ Read Full Article
Mastering Angular 19: The Ultimate Learning Guide for Frontend Developers
Welcome to this Angular 19 learning guide, a detailed guide for frontend developers of both beginning and medium levels. In this post, we will build up your knowledge from the basics of setting up an Angular 19 environment to advanced topics like state management and performance optimization. The guide is divided into multiple parts, each focusing on a key aspect of Angular development. We’ll cover installation, the Angular CLI, components and modules, data binding, services, routing, forms, HTTP integration, new Angular 19 features, state management (NgRx), component communication, lazy loading, testing, deployment, and Progressive Web Apps. Along the way, you’ll find references to useful documentation or blog posts for further reading. By the end, you should be well-equipped to start and build Angular 19 applications from scratch using modern best practices.
Part 1: Installation and Setup of Angular 19 Development Environment
Before diving into Angular coding, we need to set up the development environment. Angular is built on top of TypeScript and requires Node.js and npm (Node Package Manager) to manage dependencies. Here are the steps to get started:
-
Install Node.js and npm: Download and install the LTS version of Node.js from the official site (Local set-up • Angular). This will also install npm. Angular requires an active LTS or maintenance LTS Node version (Local set-up • Angular).
-
Install Angular CLI: The Angular CLI is a command-line tool that simplifies Angular development. Install it globally by running
npm install -g @angular/cliin your terminal (Local set-up • Angular). (You can also useyarn,pnpm, orbunas shown in the docs (Local set-up • Angular).) -
Create a New Project: Use the CLI to bootstrap a new Angular workspace. For example,
ng new my-appwill create a new folder my-app with a starter Angular application (Local set-up • Angular). The CLI will prompt you for options (like adding routing, choosing CSS preprocessor, etc.), or you can supply flags for a non-interactive setup. -
Navigate to Project & Start Dev Server: Go into the project directory
cd my-app, then launch the development server withng serve -o(which openshttp://localhost:4200automatically) (Local set-up • Angular). You should see Angular’s default welcome app running in your browser.
After a successful setup, your Angular CLI version should correspond to Angular 19 (you can check with ng version). The default app is a simple “Welcome to Angular” page. Now you’re ready to explore the project structure and start coding!
Summary – Installation & Setup: You installed Node.js, set up the Angular CLI, created a new Angular 19 project, and ran it locally. The Angular CLI scaffolds a starter app so you can jump straight into development (Local set-up • Angular). Next, we’ll examine the structure of the project that the CLI has created.
Part 2: Understanding Angular CLI and Project Structure
Angular projects follow a standard structure, which the CLI sets up for you. This structure helps organize code and configuration. Let’s break down the key files and directories in a new Angular 19 workspace:
-
Angular Workspace and Project: When you ran
ng new, it created an Angular workspace with a default application project inside (File structure • Angular) (File structure • Angular). By default, the project name is the same as the workspace (e.g., my-app). -
Top-level Files: In the workspace root, you will find configuration files like
angular.json(CLI build and project config),package.json(npm dependencies),tsconfig.json(TypeScript config), and support files likeREADME.md,.editorconfig,.gitignore(File structure • Angular) (File structure • Angular). These configure how your Angular app builds and runs. -
The
src/Directory: This contains the source code of your application (File structure • Angular). Key files include:-
src/main.ts– The main entry-point file that bootstraps the Angular application. -
src/index.html– The main HTML file. The CLI injects your bundles into this file when building (File structure • Angular). -
src/styles.css– Global CSS styles for your app. -
src/app/– This folder contains the application code (initially a single Angular module and component).
-
-
App Module: By default (for non-standalone setups), you have
src/app/app.module.tswhich defines the root Angular NgModule (AppModule). This module declares the root component and imports BrowserModule, etc., to launch the app (Angular Beginners Guide #1— Components and Modules | by Brandon Wohlwend | Medium) (Angular Beginners Guide #1— Components and Modules | by Brandon Wohlwend | Medium). (We will discuss NgModules in detail soon.) -
App Component:
src/app/app.component.tsis the root component class (AppComponent), and it has an associated templateapp.component.htmland stylesapp.component.css. This component is what you see on the welcome page. Angular CLI also setAppComponentas the bootstrap component in AppModule (meaning Angular should load this component at application start). -
Environment Files: Inside
src/environments/(if present), you might seeenvironment.tsandenvironment.prod.tsfor development and production environment-specific settings (like API endpoints or whether to enable production mode).
For Angular 19 and beyond, there’s a shift towards standalone components (which can work without NgModules). If you created your project with the standalone flag, you would see an app.config.ts instead of app.module.ts (File structure • Angular). Angular 19 actually flips the default to use standalone components by default in new projects (Meet Angular v19. In the past two years we doubled down… | by Minko Gechev | Angular Blog). In such a case, the main.ts will use bootstrapApplication(AppComponent) instead of bootstrapping a module. Both approaches are valid, but the trend is toward standalone APIs for simplicity.
Understanding the project structure helps you know where to find things and how Angular organizes your app. You can always use the Angular CLI to generate new components, modules, services, etc., which will place files in the appropriate folders.
Summary – CLI Project Structure: The Angular CLI created a logical folder structure: a root workspace with configuration files and a src folder containing your application code (File structure • Angular). The key parts are the app module (or config), the root component, and global files like main.ts and index.html. Knowing these locations is important as we dive into building out the app’s features.
Part 3: Components, Modules, and Templates
Components are the core building blocks of Angular applications. Each component controls a portion of the UI (called a view) and encapsulates its own logic and data (Angular Beginners Guide #1— Components and Modules | by Brandon Wohlwend | Medium). In Angular, a component is essentially a class tied to an HTML template. Components are often small, reusable pieces of the interface – for example, a header navbar, a footer, or a user profile card can each be a component (Angular Beginners Guide #1— Components and Modules | by Brandon Wohlwend | Medium). The beauty of components lies in their reusability and encapsulation: a well-designed component can be dropped into different parts of your app (or even into other projects) without modification (Angular Beginners Guide #1— Components and Modules | by Brandon Wohlwend | Medium). This makes the app easier to maintain and develop.
Let’s look at how to define a basic component in Angular. We use the @Component decorator to mark a class as a component and provide metadata like its selector (HTML tag), template, and styles:
import { Component } from '@angular/core';

@Component({
  selector: 'app-hello',            // the HTML tag to use this component
  template: `<h1>Hello, !</h1>`,  // inline template (could also use templateUrl)
  styles: [`h1 { color: steelblue; }`]     // inline styles (or use styleUrls for file)
})
export class HelloComponent {
  name: string = 'Angular 19';
}
In this example, HelloComponent displays a greeting. The syntax is Angular interpolation (one-way data binding) – we’ll explain that in the next section. The component can be used in a template via its selector <app-hello></app-hello> once it’s declared in an Angular module or if it’s standalone.
Templates are the HTML views for components. Angular templates are like regular HTML but with additional template syntax for data binding, directives, and more. In the above example, the template is very simple. Typically, you’ll have a separate HTML file (e.g., hello.component.html) especially for larger templates. In a component class, you can use templateUrl: './hello.component.html' to link an external template file.
Modules (NgModules) in Angular are containers that group related components and other code. Historically, Angular required you to declare components in an NgModule before you could use them. An NgModule is defined with the @NgModule decorator, which takes metadata including declarations (components, directives, pipes that belong to this module), imports (other modules whose exported components are needed), providers (services that this module contributes to the app), and bootstrap (the root component to bootstrap, only in the root module) (Angular Beginners Guide #1— Components and Modules | by Brandon Wohlwend | Medium) (Angular Beginners Guide #1— Components and Modules | by Brandon Wohlwend | Medium). For example, a simplified root AppModule might look like:
import { BrowserModule } from '@angular/platform-browser';
import { NgModule } from '@angular/core';
import { AppComponent } from './app.component';
import { HelloComponent } from './hello.component';

@NgModule({
  declarations: [ AppComponent, HelloComponent ],  // components in this module
  imports: [ BrowserModule ],       // import BrowserModule (needed for web apps)
  providers: [ /* global services, if any */ ],
  bootstrap: [ AppComponent ]       // root component to boot (only in root module)
})
export class AppModule { }
Here we declare both AppComponent and HelloComponent in the module so Angular knows about them. BrowserModule is imported to provide critical services needed to run an app in the browser (like the DOM renderer). We bootstrap the AppComponent to start the app. In feature modules (non-root), you wouldn’t have a bootstrap but might export components for use elsewhere.
With Angular 19, thanks to standalone components, you can also create components that don’t need to be declared in any NgModule. A standalone component declares its own module-like metadata (like what imports it needs). For example:
@Component({
  standalone: true,
  imports: [CommonModule],       // other components/directives this component uses
  selector: 'app-standalone-hello',
  template: `<h2>Hello from standalone!</h2>`
})
export class StandaloneHelloComponent { }
This component can be used by importing it directly in other standalone components or adding to routes, etc., without being part of an NgModule. In Angular v19, new projects default to standalone components (no AppModule by default) (Meet Angular v19. In the past two years we doubled down… | by Minko Gechev | Angular Blog), simplifying the architecture by reducing the boilerplate of NgModules. However, understanding NgModules is still important because existing projects and many libraries use them, and the Angular documentation and terminology often refer to modules for structuring large apps.
Summary – Components & Modules: A component in Angular consists of a TypeScript class, an HTML template, and (optionally) CSS styles, controlling a specific view in the app (Angular Beginners Guide #1— Components and Modules | by Brandon Wohlwend | Medium). Components make the UI modular and reusable. NgModules are Angular’s way to organize and group components and provide context for compilation – they declare which components exist and can be used together (Angular Beginners Guide #1— Components and Modules | by Brandon Wohlwend | Medium). The root NgModule (often AppModule) bootstraps the app, and you can have feature modules for different sections of your app. Angular 19 emphasizes standalone components (components that act as their own module) to streamline development. Next, we’ll explore how data flows in these templates via data binding, and how directives extend what can be done in templates.
Part 4: Data Binding and Directives
One of the strengths of Angular is its powerful data binding system, which keeps the template and the component class in sync. Data binding allows you to seamlessly bind component fields to the template and respond to user events. Angular supports several types of binding:
-
Interpolation (Text Binding): Using
in the template to display a component property’s value as text. This is one-way from the component to the view. For example,<p>Hello </p>will insert the value ofthis.usernamefrom the component into the paragraph (Binding dynamic text, properties and attributes • Angular). Wheneverusernamechanges, the UI updates automatically (Binding dynamic text, properties and attributes • Angular). -
Property Binding: Using square brackets
[ ]to bind an expression to an HTML property or DOM attribute. For example,<button [disabled]="isDisabled">Submit</button>will disable the button if the component’sisDisabledproperty is true. Property binding is also one-way (component -> view) and is useful for non-text properties like element attributes, classes, etc. (Binding dynamic text, properties and attributes • Angular) (Binding dynamic text, properties and attributes • Angular). -
Event Binding: Using parentheses
( )to bind to an event emitted by an element or child component. For example,<button (click)="onSave()">Save</button>calls the component’sonSave()method whenever the button is clicked. This is one-way from view to component (user input to component logic). -
Two-way Binding: Using the special
[()]“banana-in-a-box” syntax which combines property and event binding. The common example is<input [(ngModel)]="email">for form inputs (withFormsModuleimported). This binds the input’s value to the component’semailproperty and also updates the property as the user types, and vice versa (Binding syntax - Angular). Two-way binding is essentially syntactic sugar for binding thevalueproperty and listening to theinputevent.
In summary, Angular data binding can be categorized by direction: from component to view (interpolation, property binding), from view to component (event binding), or both (two-way) (Binding syntax - Angular). This system greatly simplifies keeping the UI in sync with application state (Binding dynamic text, properties and attributes • Angular).
Example of Data Binding in a Template:
<h2></h2>              <!-- interpolation: displays component.title -->
<img [src]="imageUrl" alt="Pic">  <!-- property binding: sets img src dynamically -->
<p [class.highlight]="isActive">Status</p> <!-- attribute binding: adds class if isActive true -->
<button (click)="toggleActive()">Toggle</button>  <!-- event binding: calls method on click -->
<input [(ngModel)]="username" placeholder="Enter name"> <!-- two-way binding -->
In the above snippet:
-
will render thetitleproperty. -
[src]="imageUrl"binds an image element’ssrcto a property. -
[class.highlight]="isActive"will add the CSS classhighlightwhenisActiveis true (this is a form of attribute binding to manipulate classes). -
(click)="toggleActive()"calls a method to change state when the button is clicked. -
The
<input>uses two-way binding so thatusernamein the component and the input field value stay in sync.
Now let’s talk about directives. In Angular, directives are classes that can modify the structure or appearance of the DOM. In fact, components are actually a special kind of directive – one with its own template (A Practical Guide to Using and Creating Angular Directives - SitePoint) (A Practical Guide to Using and Creating Angular Directives - SitePoint). Aside from components, Angular has two other types of directives:
-
Structural Directives: These directives alter the layout by adding or removing elements from the DOM. They typically use an
*prefix in templates. Examples of built-in structural directives are*ngIf(which conditionally includes/excludes an element) and*ngFor(which repeats an element for each item in a collection). For instance,<div *ngIf="isLoggedIn">Welcome!</div>will only render thatdivifisLoggedInis true. Similarly,<li *ngFor="let item of items"></li>will generate an<li>for each item. Structural directives generally work by expanding or removing DOM nodes (under the hood, Angular translates them to<ng-template>elements) (Structural directives - Angular) (Structural directives - Angular). -
Attribute Directives: These directives affect the appearance or behavior of existing elements (without adding/removing DOM). They act more like decorators on elements. A common example is
ngClass(which adds/removes CSS classes based on an expression) orngStyle(which sets inline styles). For example,<p [ngClass]="{'active': isActive}">Hello</p>will apply the “active” class to the paragraph ifisActiveis true. Attribute directives can also be custom – for instance, you could write a directive to auto-focus an input or to format text. They are used by putting them in element tags as if they were attributes.
To summarize the three types: Components, Attribute directives, and Structural directives (A Practical Guide to Using and Creating Angular Directives - SitePoint). Components have a template. Attribute directives manipulate an existing element’s behavior or style. Structural directives add or remove elements in the DOM.
Angular comes with several built-in directives (like *ngIf, *ngFor, ngClass, ngStyle, etc.), and you can create your own by using the @Directive decorator for attribute/structural directives. For example, a simple custom attribute directive to set background color might be:
import { Directive, ElementRef, Input, OnInit } from '@angular/core';

@Directive({
  selector: '[appHighlight]' // usage: as an attribute e.g. <p appHighlight="yellow">Hello</p>
})
export class HighlightDirective implements OnInit {
  @Input('appHighlight') highlightColor: string;  // the value passed to the directive

  constructor(private el: ElementRef) { }

  ngOnInit() {
    this.el.nativeElement.style.backgroundColor = this.highlightColor || 'lightyellow';
  }
}
This directive can be applied to any element by adding appHighlight="color". When initialized, it sets the element’s background. This shows how directives can extend HTML with custom behavior.
Summary – Data Binding & Directives: Angular templates connect to component code through data binding. You can display data with interpolation, bind element properties and events, and even set up two-way binding for forms (Binding syntax - Angular). Directives add superpowers to your HTML: components (directives with a template) control sections of the UI, structural directives like *ngIf and *ngFor shape the DOM structure, and attribute directives like ngClass tweak element behavior or styling (A Practical Guide to Using and Creating Angular Directives - SitePoint). Together, binding and directives make templates dynamic and responsive to your application state. Next, we’ll see how to keep our code organized and share logic using services and dependency injection.
Part 5: Services and Dependency Injection
As your application grows, you’ll want to organize business logic and data retrieval in a reusable way. Services in Angular are classes that provide specific functionality – for example, fetching data from an API, logging, or managing user authentication state. Services are usually free of UI (they don’t know anything about HTML or DOM), making them ideal for sharing data and logic across components.
Angular has a built-in mechanism for delivering instances of services to the parts of your app that need them: Dependency Injection (DI). Dependency injection is a design pattern where a class asks for (“injects”) its dependencies rather than creating them itself. In Angular, this is typically done by defining a constructor parameter with the service type, and Angular’s DI framework provides an instance for you.
To create a service, you can use the CLI (ng generate service my-service) or write a class with the @Injectable() decorator. The @Injectable decorator marks the class as available for DI and can also specify providedIn scope. A common pattern is:
import { Injectable } from '@angular/core';

@Injectable({
  providedIn: 'root'   // This means the service is a singleton available application-wide
})
export class DataService {
  private data: string[] = ['Angular', 'Vue', 'React'];

  getData(): string[] {
    return this.data;
  }
}
Here DataService is a simple service that holds an array. The providedIn: 'root' means Angular will provide a single instance of this service at the root injector (making it a singleton for the whole app) without needing to explicitly list it in an NgModule’s providers. Now any component or service that declares a dependency on DataService will get this instance.
Using a service via dependency injection is straightforward. In a component, you request the service in the constructor:
import { Component, OnInit } from '@angular/core';
import { DataService } from './data.service';

@Component({
  selector: 'app-sample',
  template: `<ul><li *ngFor="let item of items"></li></ul>`
})
export class SampleComponent implements OnInit {
  items: string[] = [];

  constructor(private dataService: DataService) { }

  ngOnInit() {
    this.items = this.dataService.getData();  // using the service
  }
}
When Angular creates SampleComponent, it sees that it needs a DataService. Angular’s injector will provide an instance of DataService (the one from the root provider, since we used providedIn ‘root’) and pass it to the constructor (Angular Services and Dependency Injection | by Krishnakumar). Now within the component we can call methods like getData(). We didn’t have to manually create DataService with new – Angular handled that.
This pattern decouples the component from the creation of the service. It also means that the same DataService instance can be shared among multiple components (if provided in root). If we wanted separate instances in different parts of the app, we could provide the service in a specific module or component injector, but that’s an advanced scenario.
Why Dependency Injection? It promotes modularity and testability. You can swap implementations of a service (for example, provide a mock DataService in tests) without changing the component code – because the component just asks for an abstract dependency. Angular’s DI is hierarchical, meaning you can have providers at the root or in sub-trees of the component hierarchy, controlling service scopes.
In summary, Angular’s DI framework allows classes (like components or other services) to declare the dependencies they need, and the framework provides them. “In Angular, DI is used to provide instances of dependencies (such as services) to classes that need them” (Angular Services and Dependency Injection | by Krishnakumar), making it easy to encapsulate common logic in services and reuse them in different places (Angular Services and Dependency Injection Explained).
Summary – Services & DI: Services are singleton (by default) helper classes for logic or data that don’t belong in the component itself. Angular’s dependency injection system makes it effortless for components to use services – just list the service in the constructor, and Angular will inject an instance for you (Angular Services and Dependency Injection | by Krishnakumar). This results in cleaner, more maintainable code, since logic can be centralized in services and components focus on the view. Now that we can create components and use services, let’s enable navigation between different views of our app with Angular’s router.
Part 6: Routing and Navigation
Single Page Applications like those built with Angular use client-side routing to navigate between views without a full page reload. Angular’s Router enables this by mapping URL paths to components. This allows users to move through the application as if it’s a multi-page site, but the content is dynamically swapped in and out in the single page.
Setting up routing in Angular involves a few steps:
-
Define Routes: A route is usually defined by a path and a component. For example, you might have a route
{ path: 'about', component: AboutPageComponent }which means when the browser URL is.../about, theAboutPageComponentshould be displayed. Routes are defined in a configuration array. Commonly, you’ll create a separateAppRoutingModuleto hold the routes (or if using standalone APIs, you’ll pass the routes toprovideRouterin main.ts). In a module-based setup, the CLI can generateapp-routing.module.tsfor you, which importsRouterModule.forRoot(routes)and exports the RouterModule so that the routes are active (Routing in Angular. Add routing to your angular project | by Mercy Jemosop | Medium) (Routing in Angular. Add routing to your angular project | by Mercy Jemosop | Medium). -
Router Outlet: In your application layout (often in AppComponent’s template), you need a
<router-outlet></router-outlet>tag. This is a placeholder where the routed components will be inserted. Think of it as a dynamic container that Angular Router uses to display each view (Routing in Angular. Add routing to your angular project | by Mercy Jemosop | Medium). For example, yourapp.component.htmlmight have a simple layout like a header, maybe a nav, and then<router-outlet>. -
Navigation Links: Instead of normal anchor tags, Angular provides the
RouterLinkdirective to enable navigation without page reload. For example:<a routerLink="/about">About</a>will navigate to the “about” route when clicked. This updates the URL and triggers the router to load the corresponding component. You can also generate links programmatically via theRouterservice (router.navigate(['/about'])). -
Configure RouterModule: In module-based apps, ensure you import
RouterModule.forRoot(routes)in your root module (or imports array of AppRoutingModule) to initialize the router with your route definitions (Routing in Angular. Add routing to your angular project | by Mercy Jemosop | Medium). For feature modules, you might useRouterModule.forChild(childRoutes).
Let’s see a simple route definition example. Suppose we want two pages: Home and About.
import { Routes, RouterModule } from '@angular/router';
import { HomeComponent } from './home.component';
import { AboutPageComponent } from './about-page.component';

const routes: Routes = [
  { path: '', component: HomeComponent },            // default route
  { path: 'about', component: AboutPageComponent },  // '/about' shows AboutPage
  { path: '**', redirectTo: '' }  // wildcard: redirect any unknown path to home
];

// If using an AppRoutingModule (NgModule way):
@NgModule({
  imports: [RouterModule.forRoot(routes)],
  exports: [RouterModule]
})
export class AppRoutingModule {}
This defines three routes: the empty path '' (default) shows HomeComponent, the 'about' path shows AboutPageComponent, and a wildcard ** that catches any undefined route and redirects to home (this prevents users from seeing a blank page on a bad URL). In a standalone setup, you’d pass routes to provideRouter(routes) in your main bootstrap instead of an NgModule.
Now the template usage:
-
In
app.component.html(or main layout), include<nav><a routerLink="/">Home</a> | <a routerLink="/about">About</a></nav> <router-outlet></router-outlet>. Therouter-outletwill display either HomeComponent or AboutPageComponent based on the current URL. -
The
RouterLinkdirectives on<a>tags update the URL and trigger navigation. You can also addrouterLinkActiveon links to apply a class when the link is active.
When a user clicks “About”, Angular intercepts the click, updates the URL to /about, and loads AboutPageComponent into the outlet (without doing a full HTTP request to the server for a new page). If the user then uses the browser back button, Angular will unload the about component and show the home component, etc., maintaining the SPA experience.
Routing features: Angular Router supports dynamic parameters (e.g., a route /products/:id to show product details based on an ID), route guards (to control access to routes, like authentication guards), lazy loading of routes (which we’ll cover later for performance), and more. For example, a route with a parameter might be { path: 'product/:id', component: ProductDetailComponent } – inside that component you can use the ActivatedRoute service to read the id parameter and fetch the appropriate data.
Routes configuration in Angular 19: A new feature in Angular v19 related to routing is Route-level Render Mode (for server-side rendering control), which we will mention later in new features. But for basic client-side routing as described here, the setup remains the same as previous versions.
One best practice is to keep your routes centralized (usually one routing module or a config object) and use the CLI to generate components with --skip-tests or such flags as needed for pages. Another tip is to use pathMatch: ‘full’ on empty path routes if needed (for example, { path: '', component: HomeComponent, pathMatch: 'full' }) to avoid partial matching issues.
Summary – Routing: With Angular Router, you define an array of routes that tell Angular which component to display for a given URL path (Routing in Angular. Add routing to your angular project | by Mercy Jemosop | Medium). The <router-outlet> in your template is a placeholder for those routed components. RouterLink allows navigation between routes without full page reloads. This turns your Angular app into a single-page application with multiple views. In the next part, we will cover handling forms in Angular – both the template-driven approach and the reactive approach – to capture user input and handle validation.
Part 7: Forms – Template-driven and Reactive
Handling user input through forms is a common task in web applications. Angular provides two distinct approaches to building forms: Template-Driven Forms and Reactive Forms (also known as Model-Driven Forms). Both approaches use the same underlying form controls and validation mechanisms, but they differ in philosophy and implementation.
Template-Driven Forms
Template-driven forms are simple to use and best for basic forms. They rely heavily on directives in the template to create and manage form controls. You mostly write the form in HTML and let Angular track the state of inputs under the hood. Key points for template forms:
-
You need to import
FormsModulein your NgModule (orprovideForms()in a standalone setup) to use template-driven forms directives likengModel. -
In the template, you use directives such as
ngModeland possiblyngForm:-
[(ngModel)]for two-way binding of inputs to component properties. -
A
#form="ngForm"on the<form>element to reference the form as an object (useful for checking form validity, etc.). -
Built-in validation attributes (required, minlength, etc.) work and Angular will reflect their state on the form controls.
-
Example (Template-Driven Form):
<form #loginForm="ngForm" (ngSubmit)="onSubmit(loginForm.value)">
  <div>
    <label>Email:</label>
    <input name="email" [(ngModel)]="email" required email>
    <!-- Angular will automatically create a FormControl for 'email' -->
  </div>
  <div>
    <label>Password:</label>
    <input name="password" [(ngModel)]="password" required minlength="6" type="password">
  </div>
  <button type="submit" [disabled]="loginForm.invalid">Login</button>
</form>
In the component, you would have email and password properties (or you could initialize them to blank strings), and an onSubmit() method to handle the form submission. The (ngSubmit) event on the form triggers when the form is validly submitted. We pass loginForm.value which is an object containing email and password.
Angular’s template-driven forms automatically track the form’s state (valid/invalid, touched/untouched, etc.) through the NgForm and NgModel directives. For instance, loginForm.invalid becomes true if any required field is missing or an email doesn’t match the email pattern, etc. You can also display validation messages by inspecting loginForm.controls.email.errors for example.
Template-driven forms are asynchronous in how they apply updates (the model in the component updates after change detection runs). They are generally easier to set up for simple cases, but as forms grow complex, you might find yourself needing more direct control, which is where reactive forms shine.
Reactive Forms (Model-Driven Forms)
Reactive forms involve creating the form model (the form controls and their validators) in the component class programmatically, rather than relying solely on the template. This gives you more control and is more scalable for complex forms. Key points:
-
Import
ReactiveFormsModulein your module (or useprovideReactiveForms()in standalone) to get reactive form directives. -
You define a
FormGroupin your component class that represents the form, withFormControlchildren for each input, and possiblyFormArrayfor dynamic lists of controls. -
The template connects to this form model using form directives like
formGroupandformControlName.
Example (Reactive Form):
In the component (TypeScript):
import { FormBuilder, FormGroup, Validators } from '@angular/forms';

export class RegisterComponent implements OnInit {
  registerForm: FormGroup;

  constructor(private fb: FormBuilder) { }

  ngOnInit() {
    this.registerForm = this.fb.group({
      name: ['', Validators.required],
      age: ['', [Validators.required, Validators.min(18)]],
      email: ['', [Validators.required, Validators.email]]
    });
  }

  onSubmit() {
    if (this.registerForm.valid) {
      console.log(this.registerForm.value);
    }
  }
}
In the template (HTML):
<form [formGroup]="registerForm" (ngSubmit)="onSubmit()">
  <label>Name: <input formControlName="name"></label>
  <div *ngIf="registerForm.controls.name.invalid && registerForm.controls.name.touched">
    Name is required.
  </div>

  <label>Age: <input formControlName="age" type="number"></label>
  <div *ngIf="registerForm.controls.age.errors?.min">
    You must be at least 18 years old.
  </div>

  <label>Email: <input formControlName="email"></label>
  <div *ngIf="registerForm.controls.email.errors?.email">
    Enter a valid email.
  </div>

  <button type="submit" [disabled]="registerForm.invalid">Register</button>
</form>
Here we use FormBuilder to build a FormGroup with three controls. Each control is initialized with a default value (’’ empty) and some validators. The template uses [formGroup] directive to bind the form to the registerForm object, and formControlName to bind each input to a specific control in the group. The template also shows how we can check control state (like invalid and specific errors) to display validation messages.
Reactive forms are synchronous; the form model is updated immediately as the user interacts. All validation logic is in the component class, making it easier to unit test and reason about (Angular Forms Guide: Template Driven and Reactive Forms). You also have the ability to dynamically add or remove controls, respond to value changes via observables (registerForm.valueChanges), and more programmatically.
Choosing between Template vs Reactive: Template-driven forms are great for simple forms and when you want Angular to handle a lot for you. Reactive forms are better for complex scenarios, forms that require conditional fields, dynamic addition of inputs, or complex validation logic. Reactive forms tend to produce cleaner HTML templates (all the logic is in the TS), whereas template forms keep the component code simpler but put more in the template. In fact, both approaches can achieve the same outcomes; it’s mostly about the scale and complexity of your form. Many developers prefer reactive forms for larger applications because of the enhanced flexibility and testability (Angular Forms Guide: Template Driven and Reactive Forms), but template forms are perfectly fine for basic needs.
Validation: Both form strategies share Angular’s validation API. Angular provides some built-in validators (like Validators.required, Validators.email, Validators.minLength(n) etc., or the plain HTML5 required attribute in template forms). You can also create custom validators for more complex rules and attach them to form controls. In reactive forms, custom validators are just functions you pass in the array of validators. In template forms, you’d usually add a directive for a custom validator or use the ngModel.errors API.
Displaying Errors: In template-driven forms, Angular automatically adds CSS classes like ng-invalid, ng-touched to form controls which you can use to style error states. In reactive forms, you manually check control status as shown in the example. Either way, providing user feedback on invalid input is an important part of form UX.
Two-way binding vs explicit model: In template forms, you often use [(ngModel)] which effectively ties a component property to an input. In reactive forms, you typically don’t use two-way binding on inputs; instead, you always refer to formControlName and the source of truth is the FormGroup. If you need to get the value out, you read this.registerForm.value or get a specific control’s value.
Summary – Forms: Angular offers two approaches to forms:
-
Template-driven forms use Angular directives in the template to create and manage the form. They are easy to start with – just add
ngModeland template references. This is suitable for simpler forms. -
Reactive forms involve explicitly creating a form model in the component class (using
FormGroupandFormControl). This approach yields more control and is better for complex forms, dynamic form changes, and unit testing validation logic (Angular Forms Guide: Template Driven and Reactive Forms). Both approaches use the same underlying FormControl objects; they just manage them differently. They also both support validators and error handling. Practice with both to see which fits your scenario – often small projects use template forms for speed, while enterprise apps lean towards reactive forms for robustness.
Now that our app can take user input, let’s see how to connect our app to a backend by using Angular’s HTTP client to fetch or save data.
Part 8: HTTP Client and API Integration
Modern web apps often need to communicate with backend APIs for data. Angular provides the HttpClient service (from @angular/common/http) to make HTTP requests (GET, POST, PUT, DELETE, etc.) and handle the responses in an RxJS Observable oriented way. This makes it easy to integrate with RESTful APIs or any HTTP-based data source.
Setting up HttpClient: First, you need to ensure the HttpClient is available in your app:
-
In an NgModule-based app, import
HttpClientModulefrom@angular/common/httpand add it to theimportsof your AppModule (or a CoreModule). This makes theHttpClientservice injectable. -
In a standalone application (as of Angular 16+), you can call the
provideHttpClient()function in thebootstrapApplicationproviders array to register HttpClient (Using HttpClient in Modern Angular Applications - This Dot Labs). This is the new tree-shakable API. For example:bootstrapApplication(AppComponent, { providers: [provideHttpClient()] });.
Once set up, you can inject HttpClient into your services or components. Typically, you will create a service specifically for API calls (keeping HTTP logic separate from UI logic). Example:
import { Injectable } from '@angular/core';
import { HttpClient } from '@angular/common/http';
import { Observable } from 'rxjs';

export interface User { id: number; name: string; /* ... */ }

@Injectable({ providedIn: 'root' })
export class UserService {
  private apiUrl = 'https://api.example.com/users';

  constructor(private http: HttpClient) {}

  getUsers(): Observable<User[]> {
    return this.http.get<User[]>(this.apiUrl);
  }

  addUser(newUser: User): Observable<User> {
    return this.http.post<User>(this.apiUrl, newUser);
  }

  // ... (put, delete, etc.)
}
Here, UserService uses HttpClient to fetch a list of users and to add a new user. Methods like http.get<T>() return an Observable<T> – Angular uses RxJS under the hood for all HttpClient methods. This means you can .subscribe() to get the result or use it with Angular’s async pipe in the template.
Using the service in a component:
export class UserListComponent implements OnInit {
  users: User[] = [];

  constructor(private userService: UserService) {}

  ngOnInit() {
    this.userService.getUsers().subscribe({
      next: (data) => this.users = data,
      error: (err) => console.error('Failed to load users', err)
    });
  }
}
And in the template: <ul><li *ngFor="let user of users"></li></ul> will display the loaded users. Alternatively, you can set users$ = this.userService.getUsers(); (type Observable<User[]>) in the component, and in the template use *ngFor="let user of users$ | async" – this way Angular will subscribe and unsubscribe automatically via the async pipe.
Error Handling & Interceptors: HttpClient has built-in support for catching errors (as seen with the error callback in subscribe). You can also use RxJS operators like catchError to handle errors in the service and perhaps transform them or retry requests. Angular also allows creation of HTTP interceptors – these are classes that implement HttpInterceptor and can intercept every request or response. Interceptors are great for adding headers (like auth tokens) to requests, logging, or global error handling (for example, redirect to login on 401 responses). To use an interceptor, you provide it in your module providers with multi: true.
Typing Responses: Notice in the service, we used this.http.get<User[]> – by specifying <User[]>, we tell TypeScript (and Angular) what shape of data to expect. This is purely for compile-time type checking; it doesn’t affect runtime. However, using proper interfaces or classes for your data models results in more robust code.
Cross-Origin Requests: If your API is on a different domain (like our example api.example.com), ensure the API server has CORS enabled for your Angular app’s domain, otherwise requests will be blocked by the browser. This isn’t an Angular issue per se, but a common setup step when working with real APIs.
Async/Await Option: Although HttpClient returns Observables, you can also convert them to promises (using .toPromise() or by await firstValueFrom(observable)). However, most Angular patterns (like the async pipe and many RxJS operators) work nicely with Observables, so it’s often idiomatic to stick with them.
GraphQL or other protocols: HttpClient can technically call any HTTP endpoint, so if you’re using GraphQL, you’ll still use HttpClient to post queries or mutations to the GraphQL endpoint (or use a library like Apollo Angular for GraphQL which wraps under the hood).
Angular 19 Note: Starting Angular 14+, there’s a new optional way to provide HttpClient (via provideHttpClient as mentioned above), but usage remains the same. In Angular 19, one of the improvements is better integration of signals with HttpClient via a new resource() API (experimental) that helps manage async data as signals – but that’s an advanced topic we’ll touch on later in new features.
Summary – HTTP Integration: Angular’s HttpClient service (from HttpClientModule) is the go-to solution for communicating with backend APIs. It’s straightforward: inject HttpClient and call methods like get, post, etc., which return Observables of typed response data. This fits naturally with Angular’s reactive patterns. Always remember to handle errors (either with RxJS operators or in subscribe), and consider using interceptors for cross-cutting concerns like authentication tokens. With data coming from an API, our app can be dynamic. Next, let’s highlight what’s new in Angular 19 and talk about best practices to keep your app up-to-date and maintainable.
Part 9: Angular 19 New Features and Best Practices
Angular is constantly evolving, and version 19 brings several noteworthy features and improvements. In this section, we’ll outline some of the Angular 19 specific features and then cover general best practices (including those relevant to Angular 19).
What’s New in Angular 19
-
Incremental Hydration (Developer Preview): Angular 19 enhances Server-Side Rendering (Angular Universal) with incremental hydration. This means that an SSR-rendered page can hydrate parts of the app on demand, rather than all at once on load. Using the new
@deferdirective, you can mark components to hydrate later (for example on interaction or when scrolled into view) (Angular v19 Released: Top Features and Updates). This leads to faster initial page loads and a smoother user experience for apps that use SSR by delaying non-critical work (Angular v19 Released: Top Features and Updates). -
Event Replay (for SSR) Enabled by Default: When using SSR, there’s a gap where a user might interact with the page before the client-side code is fully loaded. Angular’s new Event Replay feature (stable in v19) captures events during that gap and replays them when the code is ready (Meet Angular v19. In the past two years we doubled down… | by Minko Gechev | Angular Blog) (Meet Angular v19. In the past two years we doubled down… | by Minko Gechev | Angular Blog). For example, if a user clicks a button before the event listener is attached, Angular will queue that click and execute it once hydration completes, ensuring no click is lost. This is now enabled by default for new SSR setups.
-
Route-level Render Mode: Angular 19 introduces fine-grained control for SSR on a per-route basis. Using a
ServerRouteconfiguration, you can specify whether a route should be rendered on the server, on the client, or prerendered (Meet Angular v19. In the past two years we doubled down… | by Minko Gechev | Angular Blog) (Meet Angular v19. In the past two years we doubled down… | by Minko Gechev | Angular Blog). For instance, you might want your/loginroute to always be server-rendered (for SEO or first paint), but an internal dashboard route to be client-rendered only. TheserverRouteConfigarray allows these settings (Meet Angular v19. In the past two years we doubled down… | by Minko Gechev | Angular Blog). This is an advanced feature for those using Angular Universal, giving more flexibility than the previous all-or-nothing SSR approach. -
Standalone Components by Default: As mentioned earlier, Angular has been moving towards standalone components (no NgModule needed for each component). In v19, the default new project sets
standalone: truefor generated components and flips the default of the CLI to generate standalone components and directives (Meet Angular v19. In the past two years we doubled down… | by Minko Gechev | Angular Blog). This means less boilerplate and the CLI will automatically remove the redundantstandalone: falsemetadata on non-standalone components during upgrades. There’s also a new strictStandalone compiler flag to enforce that all components in a project must be standalone (if you opt-in) (Meet Angular v19. In the past two years we doubled down… | by Minko Gechev | Angular Blog) (Meet Angular v19. In the past two years we doubled down… | by Minko Gechev | Angular Blog), which can encourage use of the modern API. -
Linked Signals and
createResource(Experimental): Angular 16 introduced the concept of Signals (a reactive primitive for state management in Angular, offering an alternative to using RxJS for component state). In Angular 19, they expanded signals with Linked Signals and a newresource()API for handling asynchronous data as signals (Meet Angular v19. In the past two years we doubled down… | by Minko Gechev | Angular Blog) (Meet Angular v19. In the past two years we doubled down… | by Minko Gechev | Angular Blog). This allows you to create an async data source (like an HTTP call) that is integrated with the signal system, making it easier to manage loading states and results in the template without manually subscribing to Observables. This feature is still experimental, but it hints at Angular’s future where signals might play a bigger role in state management. -
Hot Module Replacement (HMR) Improvements: Angular 19 now has out-of-the-box support for HMR for styles and (in experimental mode) for component templates (Meet Angular v19. In the past two years we doubled down… | by Minko Gechev | Angular Blog). HMR means when you edit a component’s CSS or HTML, the change can be applied in the browser without a full reload of the app and without losing state. Previously, Angular only had reliable HMR for component TypeScript changes via the CLI option. Now style changes are hot-reloaded by default, and you can opt-in to template HMR by setting an environment variable when running
ng serve(Meet Angular v19. In the past two years we doubled down… | by Minko Gechev | Angular Blog). This greatly shortens the feedback loop during development – for example, tweaking CSS will instantly reflect in the browser. -
Modernized Angular Language Service & Code Mods: The Angular team continually improves the developer experience. In v19, the Angular Language Service (the VSCode/IDE plugin that offers type checking and autocompletion in templates) can run schematics directly from the editor for certain refactors (experimental). Also, new code migrations (codemods) are included when updating to help move your code to recommended patterns (like standalone components).
-
Reporting Unused Imports: For standalone components, Angular 19 introduces a developer tooling improvement: the compiler can warn about unused imports in component metadata (Meet Angular v19. In the past two years we doubled down… | by Minko Gechev | Angular Blog). This helps keep your component declarations clean, especially since standalone components often import other components and directives.
-
Minor Features and Updates: There’s a new Time Picker component in Angular Material v19 (if you’re using Angular Material library). Also, improvements in Angular CDK like two-dimensional drag-and-drop. Angular 19 also had some security hardening (e.g., Trusted Types support improvements) and dropped support for older Node versions aligning with Node LTS.
In summary, Angular 19 focuses on performance (SSR hydration, event replay), developer experience (HMR, standalone by default), and the continued evolution of the Angular model (signals, optional NgZone efforts under “zoneless”). Many of these features are opt-in or targeted at larger apps (like those using SSR), so if you are building a simple client-rendered app, you might not directly feel all of them. But it’s good to be aware as the framework moves forward.
Best Practices for Angular Development (Modern Angular)
Regardless of version, certain best practices help ensure your Angular app is maintainable, performant, and robust. Here are some key best practices, including those particularly relevant in Angular 19:
-
Use the Angular CLI for Everything: Generate components, services, modules, etc., using CLI commands (
ng generate component xyz). This ensures the structure and boilerplate follow Angular conventions. The CLI also handles linting, formatting (with Angular’s default configuration), and updating dependencies (viang update). -
Embrace Standalone Components and Modern API: With Angular 19, it’s recommended to use standalone components and injectables for new code where possible, as this reduces NgModule overhead and aligns with the future direction of Angular. If your project still uses NgModules heavily, consider gradually refactoring feature modules to standalone components (Angular provides a schematic to help with this). That said, don’t mix approaches arbitrarily; have a clear strategy if migrating.
-
Follow the Official Style Guide: Google’s Angular style guide provides conventions on project structure, file naming, component conventions, etc. This includes things like using consistent prefixes for selectors (like
app-), using one component per file, etc. Adhering to these conventions makes your code more uniform and team-friendly (Best Practices and Guidelines for Angular development - Medium). (The style guide has been updated in 2024 to include standalone components and other modern practices.) -
Keep Components Focused: Components should ideally focus on presenting data and handling user interaction. If you find a component doing heavy computation or containing a lot of business logic, that logic might belong in a service or utility. This makes components easier to read and test. A good rule is if multiple components need the same logic, it should be in a service.
-
Use OnPush Change Detection (Where Appropriate): By default, Angular uses the “check always” change detection strategy which checks every component on each event loop tick. Setting your component’s changeDetection to
ChangeDetectionStrategy.OnPushcan improve performance by telling Angular to skip checking that component unless an @Input changes or an observable emits etc. This pairs well with immutable data patterns or signals. However, be cautious – OnPush requires understanding how Angular checks for changes, so ensure to update reference values properly. With the rise of signals (which provide fine-grained reactivity), OnPush might become less critical, but it’s still a useful optimization especially in larger apps (Should use ChangeDetectionStrategy.OnPush for eveything?) (Optimizing Angular Performance: Best Practices - LinkedIn). -
Optimize Structural Directives with
trackBy: When using*ngForto loop over a list of items, if the list can be large or frequently changed, provide atrackByfunction. This helps Angular identify list items by a key (like an ID) and only re-render those that actually changed, rather than destroying and re-creating all DOM elements on each update. This is an easy win for performance with lists. -
Lazy Load Modules/Routing for Large Apps: Split your app into feature modules or routes and lazy load them so that initial bundle size is smaller. As we will see in the next section, lazy loading routes ensures that code for, say, an admin dashboard isn’t loaded until the user actually navigates there (javascript - Angular Lazy Loading Feature Module Routes - Stack Overflow). The Angular CLI will automatically chunk lazy loaded modules. Use this for routes that users might not hit every session (especially big sections of the app).
-
State Management Discipline: For global or shared state, especially in complex apps, consider using a state management library like NgRx. NgRx fosters a unidirectional data flow and can help manage complex state transitions in a predictable way (NgRx). If NgRx feels heavy for your needs, simpler patterns like using an
@Injectable()service with a BehaviorSubject, or Angular signals, can also manage state. The key is to have a single source of truth for critical state (avoid scattering mutable state across components). In Angular 19, signals are an emerging alternative for component-level state instead ofBehaviorSubject. Evaluate what fits your team: NgRx for very large scale, or simpler stores for smaller apps. (We’ll discuss NgRx in the next part.) -
Reusable Components and Modules: Identify pieces of UI that repeat and turn them into reusable components. If you have directives or pipes that could be reused across the app, consider collecting them in a shared module (or as standalone and then import where needed). This reduces duplication.
-
Testing: Write unit tests for your services and components, particularly core logic. Angular comes with Jasmine/Karma setup by default. Use TestBed to create components and inject services in tests. For components, you can use shallow tests (with
schemas: [NO_ERRORS_SCHEMA]to ignore unknown child components) or include needed imports. Aim to test inputs and outputs of components, and service methods. End-to-end tests are also important; consider using Cypress for e2e as Protractor is deprecated (Angular CLI no longer includes Protractor by default after v12). We’ll detail testing soon, but as a practice: runng testregularly and ensure new features have corresponding tests. -
Accessibility and UX Best Practices: Use semantic HTML in templates, add ARIA labels where appropriate, and ensure your components are accessible (Angular Material components, for example, are accessibility-friendly out of the box). Also handle loading states (spinners when data is loading) and graceful error messages when operations fail.
-
Keep Angular Up-to-date: Angular releases come out regularly (twice a year for major versions approximately). Use
ng updateto stay on the latest version. Angular 19 is backwards-compatible with 15/16/17 for the most part, and updating ensures you get performance improvements and security fixes. The Angular Update Guide (on update.angular.io) provides step-by-step instructions for version jumps. -
Enable Strict Mode: When creating a new app, Angular offers a strict mode (which turns on TypeScript strict mode and some additional Angular compiler checks). This mode catches a lot of errors early (like null or undefined issues) and is recommended for new projects. If you have an older project, consider enabling as many strict checks as feasible.
-
Clean Up Unused Code: Remove unused imports (Angular 19 might warn for standalone imports (Meet Angular v19. In the past two years we doubled down… | by Minko Gechev | Angular Blog)) and files. Tree-shaking will remove unused code in production builds, but keeping your codebase clean is good for maintainability.
-
Performance Profiling: Use tools like Angular DevTools (browser extension) to profile change detection and component trees. This can help identify if any component is updating too often. Also, pay attention to bundle size – the CLI will show warnings if your bundle gets too large. Use lazy loading and consider adopting module federation or micro-frontends for very large applications if needed.
Summary – Angular 19 & Best Practices: Angular 19 brings improvements in SSR, signals, and developer ergonomics that keep the framework modern and efficient. By adopting best practices – from architectural patterns (standalone components, state management) to coding standards (style guide, small focused components) and optimizations (OnPush, lazy loading) – you ensure your Angular applications are high-quality and future-proof. Keep learning from the community (Angular blog posts, documentation, conferences) as best practices evolve. Next, let’s dive deeper into one important best practice for larger apps: using a dedicated state management library like NgRx.
Part 10: State Management with NgRx (or Alternatives)
As applications grow in complexity, managing the state (the data that drives your UI) becomes challenging. State might include things like the logged-in user info, a list of products in a shopping cart, UI settings, and so on. In a simple app, you might manage state with just services or component interactions, but in larger apps you may want a more structured approach. NgRx is the official Angular library for state management, inspired by the Redux pattern (State management with NgRx in Angular | by Igor Martins - Medium).
Introducing NgRx
NgRx consists of several libraries, but the core is NgRx Store. NgRx Store allows you to maintain a single global state object for your application. Components dispatch actions (plain objects describing what happened), and pure functions called reducers handle these actions to produce a new state. This results in a unidirectional data flow:
-
User does something in the UI.
-
Component dispatches an Action (e.g.,
{ type: '[Cart] Add Item', item: {...} }). -
A Reducer function, which is listening for that action type, returns a new state with the item added to the cart.
-
The global Store updates with the new state. Components that are subscribed to parts of the state (selectors) automatically get the new data and update the view.
NgRx also includes Effects for handling side effects (like API calls) in response to actions, so that reducers remain pure. With Effects, when an action like “load data” is dispatched, an effect catches it, performs an HTTP request via a service, then dispatches a success or failure action with the result.
This pattern can initially be a learning curve, but it offers predictability: state changes are centralized and traceable (you can log all actions and see how state changed over time, which greatly aids debugging). NgRx also has dev tools integration (Redux DevTools) to time-travel debug the state.
Setting up NgRx: You can add NgRx to your project via CLI schematics: ng add @ngrx/store@latest (and similarly for effects, devtools, etc.). You define a state interface, action creators (using NgRx’s createAction function), reducers with createReducer, and selectors to retrieve slices of state.
A quick conceptual example for understanding: Let’s say we manage authentication state using NgRx:
-
State interface:
{ auth: { user: User | null, token: string | null, loading: boolean } }. -
Actions:
login,loginSuccess,loginFailure,logout, etc. -
Reducer listens for
login(sets loading true),loginSuccess(sets user and token, loading false),loginFailure(sets error, loading false),logout(clears user and token). -
An Effect might listen for the
loginaction, then call an AuthService to perform the HTTP login, then dispatch success or failure accordingly.
In your components, you don’t manually call services; instead you dispatch login action with credentials, and the effect & reducer take care of the rest. The component then selects (subscribes to) the auth.user and auth.loading from the store to reflect changes in the UI (like showing a loading spinner or greeting the user on success).
NgRx is powerful but does introduce boilerplate. For intermediate apps, you might opt for lighter solutions:
-
BehaviorSubject in a Service: You can create a singleton service that holds a
BehaviorSubjectwith some state and exposes Observables for components to subscribe. Components then call methods on the service to update the state (the service internally nexts new values on the subject). This is simpler but you have to enforce discipline (only update state in one place). -
NGXS or Akita: These are alternative state management libraries for Angular. NGXS is somewhat similar to NgRx but with a different, more OOP approach (using decorators for state slices). Akita is another library that treats state in a more service-based way. They aim to reduce boilerplate. Depending on your preference, these can be considered.
-
Signals (Angular 16+): Angular’s new signals feature can be used for state as well. For example, you can create a store service using
signal()for state variables andcomputed()for derived state, andeffect()to respond to changes. This is a more granular approach and is still evolving. It could eventually reduce the need for large state libraries for medium-sized use cases.
When to use NgRx: If your app has a lot of shared state and you find that passing data via @Input/@Output or services is getting tangled, it might be time for a state store. The rule of thumb is: if many components need to access and modify certain global data (and you want a single source of truth), a state management library helps. If your app is small or medium and only a couple of services hold state decently, you might not need NgRx. Over-engineering state management can lead to unnecessary complexity.
NgRx also encourages immutability (state is usually treated as immutable – each change returns a new state object). This works well with Angular’s change detection (OnPush, etc., since new object references trigger updates).
Using the Store in Components: With NgRx, instead of injecting a service to get state, you inject the Store. For example:
constructor(private store: Store<AppState>) {}

ngOnInit() {
  this.user$ = this.store.select(selectCurrentUser);
}

logout() {
  this.store.dispatch(logout());
}
Here selectCurrentUser is a selector function that plucks the user from the state. The user$ is an Observable the template can subscribe to with async. Dispatching the logout action will trigger the reducer to clear user data globally.
DevTools: If you install the Redux DevTools extension and include StoreDevtoolsModule.instrument() in your app (which ng add @ngrx/store-devtools sets up for you), you can inspect the state and actions in runtime. This is a huge aid for debugging complex flows.
NgRx Best Practices: Co-locate actions, reducer, and selectors for a feature in one folder. Use the NgRx createFeature and createSelector utilities to organize features. Keep side-effect logic (API calls, etc.) in Effects, not in reducers (reducers must be pure). Use NgRx entity adapters if dealing with collections of items (they make managing collections in state easier, providing methods to add/remove/update by id). And keep the store state as minimal as possible (don’t store redundant or easily derivable data in the store – derive it with selectors instead).
Angular 19 doesn’t change NgRx fundamentally (NgRx has its own versioning). But Angular’s introduction of signals is something to watch: future NgRx versions might integrate signals, or some state might be managed with signals outside of NgRx.
Summary – State Management: NgRx provides a structured, scalable pattern for managing global state in Angular apps, using a unidirectional data flow and RxJS (NgRx). It is great for large applications with complex interactions. However, it’s not the only solution – for smaller apps, simpler patterns or other libraries might suffice. The key is to avoid inconsistent state and propagation issues by choosing one source of truth for your data. If using NgRx, follow its patterns strictly to get the full benefits (predictability and maintainability).
With state management in place, next we will discuss component communication patterns (for components that aren’t parent-child) and how to handle events and data between components without always relying on a global store.
Part 11: Component Communication and Event Handling
In an Angular application, you will often have multiple components that need to work together or share data. Angular provides multiple mechanisms for component communication, depending on the relationship between components:
-
Parent to Child using @Input: If you have a parent-child relationship (one component is used within another’s template), the simplest way to pass data is through
@Inputproperties. The parent sets a value binding in the child’s element. For example:// child.component.ts @Input() item: string;In parent template:
<child-component [item]="selectedItem"></child-component>This passes the
selectedItemvalue down into the child. Changes in the parentselectedItemwill update in the child. This is one-way downward communication. -
Child to Parent using @Output and EventEmitter: To send data or events upward, a child can define an
@Outputproperty, which is typically anEventEmitter. The parent template can bind to this event. For example:// child.component.ts @Output() itemSelected = new EventEmitter<string>(); onClick(item: string) { this.itemSelected.emit(item); }In parent template:
<child-component (itemSelected)="onItemSelected($event)"></child-component>Now when the child calls
this.itemSelected.emit(...), the parent’sonItemSelectedhandler is invoked with the emitted value. This is how child components can notify parents about something (like a user action or some data readiness) (Sharing data between child and parent directives and components). It’s a best practice to design clear Inputs and Outputs for reusable components to define their API. -
Sibling Components via a Shared Service: If two components do not have a direct parent-child relationship (for example, siblings in the component tree, or completely separate routes), they can communicate through a shared service. The service can hold shared state or expose Observables/Subjects for events. For instance, you might have a
SelectionServicewith aselectedItem$Observable that one component updates and another subscribes to. Or simply have methods to set/get data. Because services are typically singletons (provided in root), they act as a communication bridge for any components that inject them. -
Using NgRx/Global State: If you have NgRx in place, siblings (or any components) can communicate via the store: one component dispatches an action (like “item selected”), and another component subscribes to the store slice to react to that. This decouples components from directly knowing about each other. It’s a bit heavy if you just need to toggle something simple, but it works at scale.
-
ViewChild for Parent accessing Child API: If needed, a parent can get a reference to a child component instance using
@ViewChild(ChildComponent) childComp: ChildComponent. This way, after the child initializes, the parent can directly call methods on the child (not a recommended pattern for most cases, but useful occasionally for focusing an input or manually triggering something in the child). -
Event Bus (Observable) for loosely-coupled events: Sometimes you might set up a simple
Subjectas an event bus in a service to emit events that any part of the app can listen to. Angular’sEventEmitteris actually just an RxJS Subject with some Angular sugar, so you could use plain Subjects in a shared service as well.
In Angular, the recommended pattern for parent-child is definitely Inputs and Outputs, as it is the clearest and uses the Angular binding system (Sharing data between child and parent directives and components). For components far apart, a shared service or global store is cleaner. Avoid trying to use a common ancestor component just to mediate between two grandchildren far apart; it’s better to use a service in that case.
Example scenario: Suppose we have a ListComponent that lists items, and a DetailComponent that shows details of a selected item. They could be siblings in a parent DashboardComponent. How to notify Detail of a selection in List?
-
We could have Dashboard host both and manage state: Dashboard template:
<app-list (itemSelected)="onSelect($event)"></app-list> <app-detail [item]="selectedItem"></app-detail>. Here, Dashboard acts as the mediator: it catches the event from list and passes the data to detail via input. -
Or use a service: Both List and Detail inject a
SelectedItemService. List, when an item is clicked, callsselectedItemService.setItem(item). Detail subscribes toselectedItemService.item$and updates itself when a new item is pushed. This way, Dashboard doesn’t need to mediate; the service handles communication. -
Using NgRx: List dispatches a “select item” action, which updates a “selectedItem” in the global state. Detail selects that piece of state (store.select) to get the current selected item.
Each approach has trade-offs. The first approach is simplest but couples the components via a parent. The service approach is decoupled but you must manage subscription lifecycles (unsubscribe or use async pipe). NgRx is very decoupled but more setup.
Event Handling Best Practices: Within a component, use Angular’s template syntax for events ((click), (change), etc.) rather than adding DOM listeners manually. If an event is meant to be exposed outwards, use Outputs. Name your output events semantically (e.g., itemSelected rather than click so parent knows what event it’s handling).
With the introduction of signals and effectful computed properties in Angular 16+, there might be new patterns emerging (like using @Input({ alias: 'someInput', transform: someSignal }) or @Output with signal-based emitters), but as of Angular 19, Input/Output with EventEmitter remains the primary pattern.
Also, avoid an anti-pattern: passing an entire service instance or a large object through an Input just to let child call methods on it. It’s usually better to call the service in the parent and pass down data. If a child needs to perform an operation (like saving data), consider raising an Output event and let the parent’s service handle it, or give the child its own service instance.
Edge Case - Communication with Ancestor Components: Sometimes, a deeply nested component needs to communicate with a far ancestor (like a modal component wanting to notify a main layout). Emitting outputs up the chain can be cumbersome if many intermediate layers. In those cases, again a service or store is the cleaner solution to bypass intermediate levels.
Summary – Component Communication: Use @Input and @Output for parent-child data flow, as they are the Angular way to pass data and events in a component hierarchy (Sharing data between child and parent directives and components). For components that are not directly related, use shared services with RxJS to share state or broadcast events. This keeps components loosely coupled. Global state via NgRx is another option for large scale communication. By using these patterns, you avoid tightly coupling components and make your app more modular. Next, we will look at how to load parts of your application on demand (lazy loading) and other performance optimizations.
Part 12: Lazy Loading and Performance Optimization
Lazy Loading is a technique to improve application load time by splitting the app into chunks and loading some of them only when needed (on demand). In Angular, lazy loading is most commonly applied to feature modules tied to specific routes. Instead of bundling the entire app into one huge JavaScript file that loads at startup, the Angular CLI can produce multiple bundles – for example, one for the main application and additional ones for each lazy-loaded feature. The router will load those additional bundles when the user navigates to that feature’s route.
Setting up Lazy Loaded Routes: Suppose you have an admin section in your app that is not needed for regular users until they log in as admin. You could put admin components into an AdminModule and configure a route to load it lazily:
// app-routing.module.ts (or routes array)
const routes: Routes = [
  { path: 'admin', loadChildren: () => import('./admin/admin.module').then(m => m.AdminModule) },
  { path: '', component: HomeComponent },
  { path: '**', redirectTo: '' }
];
With this, when a user navigates to /admin, Angular will dynamically import the AdminModule bundle. The first time, it fetches the bundle (a separate .js file), and subsequent navigations to /admin are instant (the bundle is cached) (javascript - Angular Lazy Loading Feature Module Routes - Stack Overflow). This greatly reduces initial load size: users who never go to /admin never pay the cost of loading that code.
In Angular 15+, if using standalone components, you can lazy load components directly with loadComponent: () => import(...).then(c => c.SomeComponent) without an intermediate module. But the concept is the same – code is split out.
Preloading Strategy: Angular router also supports preloading – which means you can configure it to, after the main app loads, quietly load some or all lazy modules in the background. There is a PreloadAllModules strategy (to load everything eventually) or you can write a custom strategy to preload certain modules based on logic (like user roles or network conditions). Preloading can improve user experience for subsequent navigation at the cost of some bandwidth upfront.
Other Performance Optimization Tips:
-
Change Detection Strategy: We mentioned using
OnPushfor components to skip unnecessary checks. Also, consider usingDetachandreattachof change detection (advanced) if you have a part of the DOM that doesn’t need updates. But signals might make fine-grained control easier in the future. -
Avoid Heavy Computation in Templates: If you do expensive calculations in template bindings (for example, calling a function that loops many times), it can slow things down because Angular may call it often. Use
Pure Pipesto compute those – pure pipes cache results for the same inputs. Or compute data in the component and bind to a property instead. -
Throttling DOM Updates: If you have events that trigger very frequently (like window scroll or mousemove bound to Angular templates), it might produce too many change detections. Use RxJS operators like
throttleTimeordebounceTimein such event handlers to limit update frequency. -
Track by in ngFor: Already mentioned, but to reiterate, always provide a
trackByfunction in *ngFor when iterating lists of objects. This prevents Angular from re-creating DOM elements when not necessary, vastly improving performance for large lists. -
Virtual scrolling: If dealing with extremely large lists, consider using the CDK’s virtual scroll (
<cdk-virtual-scroll-viewport>) which only renders items visible in the viewport. -
Web Workers: For CPU intensive tasks (image processing, large calculations), Angular provides a way to offload to web workers (so the UI thread isn’t blocked). This is a more specialized optimization.
-
Memory leaks: Ensure to unsubscribe from Observables in components (if not using
asyncpipe which auto-unsubscribes). Leaked subscriptions or timers can keep components in memory and degrade performance. -
Optimize Asset Loading: Use Angular CLI’s budgets in angular.json to get warnings if your bundle exceeds a certain size. Use lazy loading for images if needed (there’s an attribute
loading="lazy"for img in modern HTML). Optimize and compress images and assets. -
Favicon and External resources: A minor thing, but ensure your favicon.ico and other external files are not too large as they can add to load time.
-
Use Production Builds: Always test performance with
ng build --configuration production(orng build --prodin older versions) because it enables Ahead-of-Time compilation, bundling, minification, and tree-shaking. The dev build is not optimized and will be slower. -
Server-Side Rendering (Universal): If your app needs better first paint performance or SEO, consider adding Angular Universal to render pages on the server. Combined with incremental hydration (in Angular 16+), you can get fast startups and gradually load the client side. This is more of an architectural decision than an in-app optimization though.
Lazy Loading Best Practice: Not every module needs to be lazy-loaded. Core modules that are always needed (like main pages) should be in the main bundle. Lazy load routes that are secondary flows. If the app is small (< several hundred KB of JS), you may not need lazy loading at all. But if you include heavy libraries (like a rich text editor, or an admin analytics dashboard library) that users only use rarely, isolate those in a lazy module.
Also note, lazy loading isn’t limited to routes. You can dynamic-import modules in response to events (like loading a specific component on the fly), but the router covers the common case.
Performance in Angular 19 context: Angular 19’s features like hydration and signals can improve performance by not doing unnecessary work (like not hydrating until needed, or signals avoiding needless checks). Also, the Angular team is exploring zoneless operation – this would mean Angular no longer relies on Zone.js to patch events, which could reduce overhead. In v19 there’s a “state of zoneless” mention, implying progress toward making zone optional. If in the future you opt out of Zone.js, you’d use signals or manual change detection to update the UI but avoid the global patching mechanism, potentially improving performance. Keep an eye on these developments as they may become best practices in future versions.
Summary – Lazy Loading & Performance: Lazy loading modules is a powerful way to decrease initial load times by splitting code and loading features on demand (javascript - Angular Lazy Loading Feature Module Routes - Stack Overflow). Coupled with techniques like OnPush change detection, efficient template code, and using Angular CDK tools (virtual scroll, etc.), you can significantly optimize an Angular app’s runtime performance. Always test with production builds and profile your app to find bottlenecks. Angular 19 adds features like incremental hydration which, if you’re using SSR, can further boost perceived performance by deferring work until necessary. With your app optimized and modularized, the final steps are ensuring quality through testing and preparing it for deployment.
Part 13: Unit Testing and End-to-End Testing
Testing is a crucial part of development, and Angular has strong support for both unit testing (testing individual components/services in isolation) and end-to-end (E2E) testing (testing the whole application in a browser).
Unit Testing with Jasmine & Karma (or Jest)
Angular CLI sets up Jasmine for writing tests and Karma as the test runner that runs those tests in a browser (PhantomJS/Chrome headless). Each generated component/service comes with a .spec.ts file. Jasmine provides a BDD-style syntax with describe blocks and it test cases, along with expectation matchers (via expect()).
Example unit test for a service:
describe('DataService', () => {
  let service: DataService;

  beforeEach(() => {
    TestBed.configureTestingModule({
      providers: [DataService]
    });
    service = TestBed.inject(DataService);
  });

  it('should be created', () => {
    expect(service).toBeTruthy();
  });

  it('should return default data', () => {
    const data = service.getData();
    expect(data.length).toBeGreaterThan(0);
  });
});
Here we use TestBed (Angular’s testing utility) to configure a module for testing, provide the service, and then retrieve an instance. We then write expectations about its behavior.
Testing Components: Components often depend on other pieces (child components, services, etc.). You have a few strategies:
-
Use
TestBed.configureTestingModuleto declare the component and any dependencies (or useschemas: [NO_ERRORS_SCHEMA]to ignore unknown elements like child components not included). -
Provide any necessary services (you can provide fake or stub services if needed to isolate the component).
-
Create a component fixture with
TestBed.createComponent(ComponentClass)and then callfixture.detectChanges()to trigger Angular’s change detection. You can then queryfixture.nativeElementorfixture.debugElementto check the rendered output, or check component properties.
Example component test:
describe('HelloComponent', () => {
  let fixture: ComponentFixture<HelloComponent>;
  let component: HelloComponent;

  beforeEach(() => {
    TestBed.configureTestingModule({
      declarations: [HelloComponent],
      // imports: [CommonModule, ...] if needed
    });
    fixture = TestBed.createComponent(HelloComponent);
    component = fixture.componentInstance;
  });

  it('should render greeting with name', () => {
    component.name = 'Angular';
    fixture.detectChanges(); // apply binding
    const h1: HTMLElement = fixture.nativeElement.querySelector('h1');
    expect(h1.textContent).toContain('Hello, Angular');
  });
});
This test sets the input name and then verifies the DOM updated correctly. You can also simulate user interaction in unit tests using DebugElement.triggerEventHandler or dispatch actual DOM events.
Isolation vs Shallow vs Integration tests: By default, you might create a component in a test without its children to isolate it (using stubs or NO_ERRORS_SCHEMA). But Angular also supports creating an entire component tree for integration tests. Decide based on context; often it’s enough to stub child components (so you test parent logic separately from child).
Jest: Some projects use Jest instead of Karma/Jasmine. Jest is a popular testing framework that can run tests in a Node environment without a real browser. It’s faster for many cases. Angular can be set up with Jest (via some community builders). But if you’re using the CLI defaults, Jasmine + Karma is what you get.
Angular Testing Library: Similar to React Testing Library, there is an Angular equivalent which encourages testing from the user’s perspective (interacting with DOM). It’s a nice add-on but not required.
End-to-End Testing (Protractor, Cypress, etc.)
End-to-end tests simulate user behavior on a running app, often using a real browser to click around and verify things. Angular CLI originally integrated Protractor for E2E tests. However, Protractor has been deprecated and reached end-of-life as of Angular 15 (Protractor Deprecation Update August 2023 | by Mark Thompson (@marktechson) | Angular Blog). Many Angular developers have switched to Cypress or Playwright for end-to-end testing.
Cypress is a popular choice because it’s easy to set up and provides a great interactive testing experience. It runs tests inside a browser, allowing you to see commands as they execute. To use Cypress with Angular, you can run ng add @cypress/schematic which will add Cypress config to your project (Protractor Deprecation Update August 2023 | by Mark Thompson (@marktechson) | Angular Blog). You write Cypress tests in a separate cypress folder. Example (Cypress):
// cypress/e2e/spec.cy.ts
describe('Login Flow', () => {
  it('should display error on wrong credentials', () => {
    cy.visit('/login');
    cy.get('input[name=email]').type('[email protected]');
    cy.get('input[name=password]').type('wrongpass');
    cy.get('button[type=submit]').click();
    cy.contains('Invalid credentials').should('be.visible');
  });
});
This uses Cypress commands (cy.get, cy.visit, cy.contains) to interact with the app.
Playwright is another modern e2e tool that can be used similarly (with ng add @playwright.BuilderName etc., though not as officially streamlined as Cypress).
Protractor (Deprecated): If you have an older Angular project, you might see E2E tests written with Protractor (which used a Jasmine-like syntax to control a Selenium WebDriver instance). For Angular 19, since Protractor is no longer supported (Protractor Deprecation Update August 2023 | by Mark Thompson (@marktechson) | Angular Blog), it’s recommended to migrate to Cypress or another tool (Top 6 Alternatives to Protractor in 2024 | BrowserStack). The Angular team provided migration guides (Protractor Deprecation Update August 2023 | by Mark Thompson (@marktechson) | Angular Blog).
Running tests: ng test runs unit tests (Karma will open a browser and execute tests, usually in watch mode). ng e2e used to trigger Protractor; with Cypress or others, you’ll run the tool’s own command (npx cypress open or similar) or integrate with ng e2e by adjusting angular.json if using a custom builder.
Continuous Integration (CI): Ensure your tests run in headless mode in CI. For Karma, the default ng test --watch=false --browsers=ChromeHeadless is used in CI scripts to run once and exit. For Cypress, use cypress run (which runs headless by default).
Writing Good Tests:
-
For unit tests, test one thing at a time (one expectation per spec ideally). Use beforeEach to setup repeated logic.
-
For services, you can sometimes use simpler patterns (no TestBed, just instantiate the service class if it has no Angular-specific dependencies). But if it injects other services, TestBed helps you provide or mock them.
-
For components with dependencies, you might use spies (Jasmine
spyOn) to simulate service calls. Angular TestBed can also inject a mock instead of the real service. -
Use Jasmine marble testing (or RxJS testing utilities) to test Observables and async code deterministically if needed.
-
In Angular 13+, TestBed automatically tears down the test module after each test to prevent memory leaks (this was a new change, in older versions you had to manually call
TestBed.resetTestingModule()sometimes). -
E2E tests: focus on critical user journeys. They are slower to run, so you typically write fewer of them compared to unit tests. But they catch integration issues (like routing misconfiguration, or real-world timing issues).
Example: An E2E test can cover things like “full login and navigate to dashboard flow works”, “unauthenticated user gets redirected from protected route”, etc. E2E tests can also be used for accessibility checks (there are plugins to run aXe or other a11y tools during E2E).
In summary, Angular’s testing ecosystem encourages you to write unit tests for components and services using Jasmine (or Jest) and to run high-level integration tests using tools like Cypress. With Protractor now retired, Cypress has become a de-facto standard for new Angular projects’ end-to-end testing (Protractor Deprecation Update August 2023 | by Mark Thompson (@marktechson) | Angular Blog). By maintaining a solid test suite, you can refactor and extend your app with confidence.
Summary – Testing: Use Karma/Jasmine or Jest for fast unit tests of your Angular classes. The Angular TestBed utility lets you easily test components in an Angular context (ensuring bindings and DI work) and services with their injections. Aim for high coverage on critical logic. For end-to-end testing, migrate to modern frameworks like Cypress since Protractor is no longer supported (Protractor Deprecation Update August 2023 | by Mark Thompson (@marktechson) | Angular Blog). E2E tests complement unit tests by verifying that the app as a whole functions correctly from a user’s perspective. With thorough testing, the last step is deploying your Angular 19 application.
Part 14: Building and Deploying Angular Apps
After development and testing, you’ll want to build your Angular app for production and deploy it to a web server or hosting service. Angular CLI makes building easy, and the output is a set of static files (HTML, CSS, JS, etc.) that can be served by any web server.
Building for Production
Use the CLI command: ng build --configuration production. This produces a “dist/” folder (by default dist/your-project-name/) with the build output. The production configuration enables optimizations like ahead-of-time (AOT) compilation, minification, Uglify, tree-shaking, and so on. The result is typically a few .js files (the main bundle and any lazy-loaded chunks), a index.html, your global styles CSS, and any assets you’ve placed in the assets folder.
For example, after building you might see in dist/my-app/:
index.html
main.<hash>.js
polyfills.<hash>.js
styles.<hash>.css
runtime.<hash>.js
... (and maybe 0.<hash>.js for a lazy module chunk, etc.)
The <hash> part is a unique hash for cache-busting.
The index.html is a stub that loads the runtime.js, which then loads the rest (Angular CLI handles that injection of script tags). If you’ve configured service workers for PWA, you’ll also see ngsw-worker.js and ngsw.json.
When you run ng build --configuration production, Angular will by default also apply any production environment configuration (like using environment.prod.ts values). You can further configure file replacements in angular.json if needed.
Note: In Angular 12+, the concept of “prod flag (–prod)” was an alias for --configuration production. In v19, just use --configuration production (or set it as default in angular.json).
Deploying
Since Angular apps are static (in terms of deployment artifacts), you have many options:
-
Hosting on a static server or CDN: Simply upload the files in
dist/my-appto a web server (like Apache, Nginx, AWS S3, Firebase Hosting, Netlify, Vercel, GitHub Pages, etc.). The key is that for a Single Page Application, if you’re using client-side routing, you need to redirect all requests toindex.html(except maybe static assets). For example, if a user directly accessesyourapp.com/about, the server should serveindex.html(which boots the Angular app and then the router takes over to show the About view). Many static hosts have a setting for this (Netlify uses_redirectsfile, GitHub Pages needs a 404 fallback to index.html since it can’t configure routing, Firebase Hosting has a config for rewrite to index). -
Node.js or Express server: You can serve the files via an Express app. Essentially something like
app.use(express.static('dist/my-app')); app.get('*', (req, res) => res.sendFile(path.join(__dirname, 'dist/my-app/index.html')));to handle the fallback. -
Deploy via Angular CLI Builders: The Angular CLI offers easy deployment to some platforms. For example,
ng add @angular/firesets up deploy to Firebase,ng add angular-cli-ghpagesallowsng deployto GitHub Pages. There are community builders for deploying to Azure, Netlify, etc. Runningng deployafter adding the appropriate builder will build and push your app to the specified hosting. -
Docker: You can also containerize your Angular app. For example, use an Nginx image and copy the dist files into
/usr/share/nginx/html. This is useful if you want to deploy to a container environment.
Post-deployment Considerations:
-
Base Href: If your app is not served from the root of a domain, set the
<base href>inindex.htmlaccordingly or useng build --base-href "/subpath/". -
Environment Variables: Sometimes you want different API endpoints for dev/prod. The Angular environment files cover this. If you need runtime config (like injecting environment via a global JS object), that’s trickier with Angular but possible (like fetch a config JSON before bootstrapping).
-
Server-side rendering: If you need SEO, you might deploy an Angular Universal version. That’s beyond static deploy; you’d run a Node server to serve pre-rendered pages. There are Angular Universal builders that can prerender to static HTML for certain routes as well (Angular 16 introduced a powerful SSG with partial hydration).
-
Security: Serve your app over HTTPS if possible (especially if it uses service workers for PWA, which require HTTPS except on localhost). Also, configure your server with appropriate security headers and maybe CSP (Content Security Policy) if applicable.
-
Testing after deploy: Always test the deployed app in production mode, including routing (make sure refresh on a deep link works, i.e., server fallback is configured).
-
Analytics/Monitoring: If you want, integrate something like Google Analytics or application performance monitoring (like Azure App Insights, Sentry for error logging, etc.) by including their scripts or using Angular integrations.
Example Deployment – GitHub Pages: One quick way to host an Angular app is GitHub Pages. You can run ng deploy --base-href=/my-repo-name/ after adding the gh-pages schematic. This will build and push to the gh-pages branch of your repo. Then GitHub serves it. Another easy host is Firebase Hosting: after ng add @angular/fire, just ng deploy (it asks you to choose a Firebase project) and it’s live on Firebase’s domain.
Docker Example Snippet:
FROM node:18-alpine as build
WORKDIR /app
COPY . .
RUN npm install
RUN npm run build --prod

FROM nginx:1.21-alpine
COPY --from=build /app/dist/my-app /usr/share/nginx/html
# Copy a default.conf if you need to configure fallback
Then run that container on a service like AWS ECS, Azure Container Apps, etc.
Conclusion – Build & Deploy: Using ng build --configuration production compiles your Angular 19 app into an optimized bundle ready for production (typescript - How do you deploy Angular apps? - Stack Overflow). The output is static files which can be deployed on any web server or hosting service. Ensure the server is configured for SPA routing (redirecting 404s to index.html). Angular CLI also supports deployment commands for convenience on certain platforms. Once deployed, your app should be accessible to users – congrats! Always verify that the production build works as expected.
Summary – Deployment: Building an Angular app yields static files in the dist folder, which you can deploy to a hosting provider or serve via a web server (typescript - How do you deploy Angular apps? - Stack Overflow). Pay attention to base href and routing configuration on the server side. With the app deployed, your journey from development to production is complete.
Part 15: Progressive Web Apps (PWAs) with Angular
Turning your Angular application into a Progressive Web App (PWA) can give it capabilities like offline access, push notifications, and the ability to install on mobile devices like a native app. Angular provides tooling to make this transformation relatively easy using service workers.
What is a PWA? It’s essentially a web application that uses modern web APIs to provide an app-like experience. Key features include:
-
Service Worker: A script that runs in the background, intercepting network requests, and caching assets/data to enable offline functionality.
-
Web App Manifest: A JSON file that provides metadata about the app (name, icons, start URL, theme colors) and allows the app to be installed to the home screen on mobile.
-
HTTPS: PWAs must be served over secure context (HTTPS) for service worker to work.
-
Capabilities: PWAs can send push notifications, access some device features (like camera, geolocation, etc., with permission), and work offline or in flaky network conditions.
Angular PWA Support: The Angular team provides the @angular/pwa schematic that you can add to your project. This sets up everything needed for a basic PWA:
-
It adds a
manifest.webmanifestfile (with default Angular logo and app name). -
It sets up an
ngsw-config.jsonwhich is a configuration for Angular’s Service Worker (@angular/service-worker). -
It adds the
@angular/service-workerpackage and registers the service worker in your app module or main.ts when in production mode. -
It updates
index.htmlto link the manifest and theme color, etc., and adds service worker script include.
How to add PWA: Run ng add @angular/pwa --project your-project-name. The project name is the Angular project in angular.json (often the same as app name). This command will perform the steps above automatically (Angular PWA, install and configure | by Pankaj Parkar | ngconf | Medium) (Angular PWA, install and configure | by Pankaj Parkar | ngconf | Medium).
After running it, check your angular.json file: it will now have a "serviceWorker": true flag under the production build configuration. This ensures the service worker script is included in prod builds.
Using the Angular Service Worker: Angular’s service worker (ngsw) will, by default, cache all files it finds in the dist (according to ngsw-config.json). The default config caches:
-
App shell files (scripts, index.html, styles) with a strategy of either freshness or performance depending on configuration.
-
Assets under
src/assetsand external resources if specified.
The Angular service worker automatically updates in the background when you deploy a new version (it does a content hash comparison of the files listed in ngsw.json). When an update is available, by default it will wait until the next reload to activate, but you can programmatically prompt users to update if desired.
Testing PWA Locally: After adding PWA, do a production build ng build --configuration production and serve the files (for example npx http-server dist/my-app). Visit the app on http://localhost:8080 (or wherever http-server runs). You won’t see the service worker active if you’re on http, but you can use http-server -S with a self-signed certificate to simulate https, or use Angular CLI’s ng serve with service worker which is tricky (by default ng serve doesn’t enable service worker as it’s a dev server). Easiest: deploy to a hosting (like Firebase hosting or GitHub pages with https) and test. Alternatively, Chrome has a feature to bypass insecure context for localhost for dev.
In DevTools > Application > Service Workers, you should see ngsw-worker.js registered when running the production build on https. Also you’ll see it using caches in the Cache Storage section.
Offline behavior: With the default config, if you go offline (disconnect internet) and refresh, the app still loads (from cache). This is a hallmark of a PWA. You can also test that new deployments update the service worker (the ngsw will fetch new asset hashes and install updated worker).
Additional PWA Features:
-
Push Notifications: You’d need to implement using something like Firebase Cloud Messaging or Web Push API. Angular doesn’t provide that out of the box, but you can integrate by listening to service worker push events.
-
Background Sync: Angular SW supports some features of the service worker like data/groups caching if configured.
-
App Installation: The manifest file added by
@angular/pwaand serving your site over https will allow Chrome to prompt “Add to home screen” or on desktop Chrome, the install option in the URL bar (the criteria being: site is PWA and has been visited enough). To test installation, use the Lighthouse audit (DevTools > Lighthouse) which will tell you if your PWA is installable (needs a manifest and service worker and served via https). -
Customization: You can fine-tune
ngsw-config.jsonto, for example, not cache certain API calls or use different strategies (freshness vs performance). By default, it caches all GET calls to same-domain fully once (not dynamic caching of API responses, unless you configure dataGroups in the config).
The default ngsw-config.json usually looks like:
{
  "index": "/index.html",
  "assetGroups": [{
    "name": "app",
    "installMode": "prefetch",
    "resources": {
      "files": [ "/favicon.ico", "/index.html", "/*.js", "/*.css" ]
    }
  },
  {
    "name": "assets",
    "installMode": "lazy",
    "resources": {
      "files": [ "/assets/**", "/*.woff2" ]
    }
  }]
}
This means it will prefetch the core files (cache them immediately on service worker install), and lazy load other assets (cache on first use).
Gotchas:
-
When developing, the service worker might cache an older version and you need to clear caches to see changes. During dev, you can disable cache or in dev mode service worker is not used. In production, Angular’s SW handles updates by versioning files (so it usually “just works” on new deploy, but if you want immediate updates you might implement a notification).
-
If your app is served from a sub-path (like
example.com/app/), ensurengsw.jsonand manifest paths align (the base-href might need to be set so the service worker knows where to intercept). -
For apps that do not need offline (like an admin app that always needs latest data), you might not want a service worker at all. PWA is optional; add it if it adds value for your use case.
Turning an existing project into PWA: The ng add @angular/pwa is the easiest route. It automatically registers the service worker in your main.ts or app.module.ts: If you inspect after adding, you’ll see something like:
// in app.module.ts or main.ts
import { ServiceWorkerModule } from '@angular/service-worker';
import { environment } from '../environments/environment';
// ...
@NgModule({
  // ...
  imports: [
    // ...
    ServiceWorkerModule.register('ngsw-worker.js', {
      enabled: environment.production,
      // Register the ServiceWorker only in production mode
      // Maybe additional options for registration
    }),
  ],
  // ...
})
This code ensures the service worker (ngsw-worker.js) is registered when ng build --prod is used (because environment.production will be true). In dev (ng serve), it won’t register it (so you don’t get stale caches during development).
Summary – PWA: By adding a service worker and a manifest, Angular can become a Progressive Web App with offline support and installability (Make Progressive Web Apps (PWA) in Angular - Ionic Tutorial). The CLI’s @angular/pwa schematic automates much of this (Make Progressive Web Apps (PWA) in Angular - Ionic Tutorial). Once configured, your app can load instantly on repeat visits (thanks to caching) and work offline to a degree (serving last cached data). PWAs combine the best of web and mobile – giving users faster access and the ability to use your app even without a network, all without going through app stores.
Conclusion
We’ve covered a comprehensive range of topics to equip you with the knowledge to build and maintain Angular 19 applications:
-
Setup and CLI: Installing Angular, using the CLI to scaffold projects and understanding the workspace structure (Local set-up • Angular) (File structure • Angular).
-
Core Concepts: Building blocks like Components (with templates and styles) (Angular Beginners Guide #1— Components and Modules | by Brandon Wohlwend | Medium), organizing them into Modules (or using standalone components) (Angular Beginners Guide #1— Components and Modules | by Brandon Wohlwend | Medium).
-
Templates: Using data binding to connect your UI and logic, and leveraging directives (ngIf, ngFor, etc.) to control DOM structure (A Practical Guide to Using and Creating Angular Directives - SitePoint).
-
Services & DI: Sharing logic through services and injecting them where needed, a fundamental design pattern in Angular (Angular Services and Dependency Injection | by Krishnakumar).
-
Routing: Configuring client-side navigation to create a SPA, with support for parameterized routes, guards, and lazy loading (Routing in Angular. Add routing to your angular project | by Mercy Jemosop | Medium) (javascript - Angular Lazy Loading Feature Module Routes - Stack Overflow).
-
Forms: Handling user input with template-driven forms for simplicity or reactive forms for power and scalability, including validation strategies (Angular Forms Guide: Template Driven and Reactive Forms).
-
HTTP: Communicating with backend APIs using HttpClient, managing asynchronous data with RxJS, and handling errors and loading states gracefully (Using HttpClient in Modern Angular Applications - This Dot Labs).
-
Angular 19 Features: Taking advantage of the latest improvements like standalone components, signals, HMR for faster development, and SSR enhancements (incremental hydration, etc.) (Meet Angular v19. In the past two years we doubled down… | by Minko Gechev | Angular Blog) (Angular v19 Released: Top Features and Updates), as well as following best practices aligned with the modern Angular ecosystem.
-
State Management: An overview of NgRx for complex state handling (NgRx), and alternatives like services or signals for simpler scenarios.
-
Component Communication: Techniques for components to interact via Inputs/Outputs or through shared services, ensuring a clean flow of data and events throughout your app (Sharing data between child and parent directives and components).
-
Performance: Strategies like lazy loading modules to reduce initial load (javascript - Angular Lazy Loading Feature Module Routes - Stack Overflow), optimizing change detection (OnPush, trackBy), and using tooling to keep your app fast and efficient.
-
Testing: Writing unit tests for reliability using Jasmine/Karma (or Jest) and using Cypress (or similar) for end-to-end tests, following Angular’s robust testing conventions (Protractor Deprecation Update August 2023 | by Mark Thompson (@marktechson) | Angular Blog) (Protractor Deprecation Update August 2023 | by Mark Thompson (@marktechson) | Angular Blog).
-
Deployment: Building your app for production and deploying it to various platforms, since the output is just static files (typescript - How do you deploy Angular apps? - Stack Overflow). We touched on configuring servers for SPA routing and leveraging CLI deployment options.
-
PWAs: Enhancing your app with progressive features like offline capability and installability with minimal effort using Angular’s PWA support (Make Progressive Web Apps (PWA) in Angular - Ionic Tutorial).
With this knowledge, you can start from scratch and iteratively build a full-featured, performant, and modern Angular 19 application. Remember to refer to official Angular documentation and the community (blog posts, forums) for deeper dives into specific topics and for updates beyond Angular 19. The Angular ecosystem is rich, and features like signals and standalone components indicate the framework is continuously improving to make developer experience and application performance better.
Now it’s time to put theory into practice: start a new Angular project, follow the parts of this guide as needed, and build something amazing!
Useful Resources & Further Reading:
-
Official Angular Documentation (angular.dev or angular.io) – e.g., the Angular Tutorial for a step-by-step project, and guides on Components & Templates, Forms, Angular Service Worker/PWA.
-
Angular Update Guide – for understanding changes from previous versions if you’re upgrading.
-
NgRx Documentation (ngrx.io) – comprehensive docs and examples for state management.
-
Community Articles – e.g., Angular Blogs on new releases (check the official Angular blog on Medium for v19 release notes (Angular v19 Released: Top Features and Updates)), and various Angular community blogs for best practices and case studies.
-
Angular 19 Features recap: Incremental Hydration, Standalone Components by default, Linked Signals & Resources, HMR for styles/templates, Route-level SSR control, etc., as summarized from Angular v19 announcement (Angular v19 Released: Top Features and Updates) (Meet Angular v19. In the past two years we doubled down… | by Minko Gechev | Angular Blog).
Happy coding with Angular 19! By following this guide and continually exploring Angular’s capabilities, you’ll be well on your way to mastering frontend development with this powerful framework.