Spring Boot 2.2 with Java 13 CRUD REST API Tutorial: Using JPA Hibernate & MySQL

Throughout this tutorial, we'll learn to build a Java 13 web application using Spring 5 and JPA. We'll build the CRUD REST API using the Spring Boot 2.2 rapid development platform.
Build a REST API Example with Java 13, Spring Boot 2.2 and JPA Hibernate
In this first tutorial, you’ll learn step by step how to build a REST API back-end, using Java 13, Spring 5, Spring Boot 2.2, JPA (Java Persistence API), Hibernate (the ORM implementation for JPA) and MySQL, for a simple customer management application.
We'll first start by generating a zero-configuration project using Spring Initializr. Next we'll configure the MySQL database and create the Customer model (business domain class), finally we'll build the API endpoints to create, read, update and delete customers data.
Prerequisites
You need to have a development environment with Java 13 installed and some working knowledge of Java.
Summary
This tutorial has the following sections:
- Introduction to Spring Boot platform
- Generating the project using Spring Initializer
- Configuring the MySQL database
- Creating the domain model (Customer)
- Creating a repository for CRUD operations
- Creating the controller
Let's get started with the introduction!
Introduction to Spring Boot 2.2
Spring Boot 2.2 is a rapid application platform that helps you accelerate and facilitate application development. You can use Spring Initializr to generate a project by filling your project details, picking your options, and finally downloading your project as a zip file.
Before you can use Sprint Boot 2.2, you need a few pre-requisites:
- Java 13 or later,
- Gradle 4.1+
- Maven
Using Spring Boot, you can build applications rapidly. It works by looking at your classpath and at beans you have configured, and add all the configurations you need so you can focus on the particular requirements of your application instead of common configuration.
Spring Boot makes bootstrapping Spring projects very quick and relieves you from the hassle of dealing with the configuration settings but in the same time doesn't get in the way if you need to manually add any configurations for more control of your project settings.
Generating the Project Using Spring Initializer
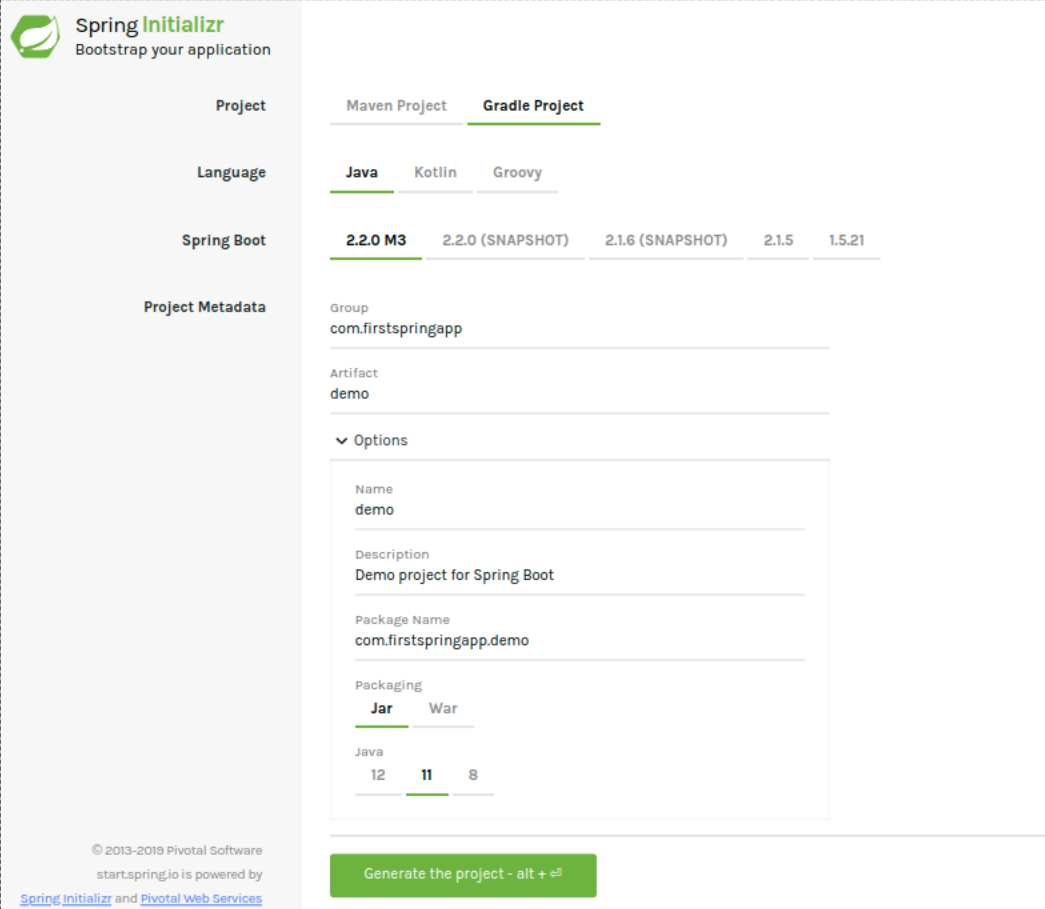
For quickly bootstrapping a project, you can use Spring Initializer, an online tool that can be used to quickly generate a zero-configuration project so simply go to the website and follow the easy steps to create your project.
After filling the details, you need to click on Generate Project to generate your project and download the zip file containing all the files of the project. You can then un-zip the compressed file and import it in your IDE.

Make sure to select Spring Boot 2.2 and Java 13 and to add the Spring Web Starter dependency which includes Spring MVC and an embedded Tomcat web server to our project.
Now, make sure you have MySQL installed on your system and proceed to the next section.
Configuring the MySQL Database
First, go to MySQL and create a database called crm_app.
After that, you need to configure the MySQL database. So open your project application.properties file and add the following properties:
## Spring  DATASOURCE (DataSourceAutoConfiguration & DataSourceProperties)

spring.datasource.url = jdbc:mysql://localhost:3306/crm_app?useSSL=false
spring.datasource.username = YOUR_MYSQL_USERNAME
spring.datasource.password = YOUR_MYSQL_DATABASE

## Hibernate  Properties
# The  SQL dialect makes Hibernate generate better SQL  for the chosen database

spring.jpa.properties.hibernate.dialect = org.hibernate.dialect.MySQL5Dialect


# Hibernate ddl auto (create, create-drop, validate, update)
spring.jpa.hibernate.ddl-auto = update
Create the Domain Model
For the sake of simplicity our application will only have one model. Create a new Java package called models inside your project and add a model named Customer.java with the following contents:
package com.techiediaries.crm.model;

import org.hibernate.validator.constraints.NotBlank;
import com.fasterxml.jackson.annotation.JsonIgnoreProperties;
import org.springframework.data.annotation.CreatedDate;
import org.springframework.data.annotation.LastModifiedDate;
import org.springframework.data.jpa.domain.support.AuditingEntityListener;

import javax.persistence.*;
import java.util.Date;


@Entity
@Table(name = "customers")
@EntityListeners(AuditingEntityListener.class)
@JsonIgnoreProperties(value = {"createdAt", "updatedAt"},
allowGetters = true)
public  class  Note  implements  Serializable {

@Id
@GeneratedValue(strategy = GenerationType.AUTO)
private  Long  id;

@NotBlank
private  String  firstName;

@NotBlank
private  String  lastName;

@NotBlank
private  String  description;

@Column(nullable = false, updatable = false)
@Temporal(TemporalType.TIMESTAMP)
@CreatedDate
private  Date  createdAt;

@Column(nullable = false)
@Temporal(TemporalType.TIMESTAMP)
@LastModifiedDate
private  Date  updatedAt;

// Getters and Setters Omitted
}
- The domain class or model is annotated with the
@Entityannotation which is used to denote a persistent Java class or JPA class. - A JPA class is mapped to a SQL table so the
@Tableannotation provides information about the table that will be created in the SQL database. - The
@Idannotation defines the primary key of the SQL table. - The
@GeneratedValueannotation defines the generation method for the primary key. In this example it's an auto incremented primary key. - The
@NotBlankannotation marks the field as not null or empty. - The
@Columnannotation defines the properties of the table column corresponding to the class field.
Creating a Repository for CRUD Operations
Now that we have defined our domain class that will be mapped to a database table in the MySQL database, Let's create a repository for implementing the CRUD operations on the domain class.
Inside your project's main package, create a package that you can call repository.
Next, create a CustomerRepository Java interface that extends JpaRepository<Customer, Long>:
package com.techiediaries.crm.repository;
import com.techiediaries.crm.model.Customer;
import org.springframework.data.jpa.repository.JpaRepository;

@Repository
public  interface  CustomerRepository  extends  JpaRepository<Customer, Long> {}
You can find more information about Spring JPA Repositories from the docs.
Creating the REST API Controller
After creating the JPA Repository that implements the necessary CRUD (Create, Read, Update and Delete) operations on the Customer model, We can now create the REST API of our simple application. This API will be used to create, update, delete and retrieve customers from the MySQL database.
Start by creating a package that you can name controller inside the main project's package (in our case it's com.techiediaries.crm).
Next create the controller class (you can name it CustomerController.java) and add the following code:
package com.techiediaries.crm.controller;
import com.techiediaries.crm.model.Customer;
import com.techiediaries.crm.repository.CustomerRepository;
import org.springframework.beans.factory.annotation.Autowired;
import org.springframework.http.ResponseEntity;
import org.springframework.web.bind.annotation.*;
import javax.validation.Valid;
import java.util.List;

@RestController
@RequestMapping("/api")
public  class  CustomerController {
    @Autowired
    CustomerRepository  customerRepository;
}
Next let's add the API endpoints/methods
Get All Customers Endpoint
Let's start by the endpoint to retrieve all customers. Add the following method to the controller class:
@GetMapping("/customers")
public  List<Customer> getAllCustomers() {
    return  customerRepository.findAll();
}
The method is annotated with the @GetMapping() annotation which makes it able to process GET requests then in the body the method simply uses the Spring JPA repository to query the database for available customers.
Create a New Customer
Now that we're able to send a GET request to retrieve a list of all customers, let's create the API method for creating new customers using the POST request:
@PostMapping("/customers")
public  Customer  createCustomer(@Valid  @RequestBody  Customer c) {

    return  customerRepository.save(c);

}
The @PostMapping is used to create a POST mapping between the API endpoint api/customers and the createCustomer() method so when a POST request is sent to this endpoint the createCustomer() method is called. The body of the method uses the .save() method to persist the provided customer data, via the request body, in the database.
Get a Single Customer
Now let's add the code to retrieve a single customer by id. We'll use the @GetMapping("/customers/{id}") annotation and the @PathVariable(value = "id") annotation to get the id of the customer from the path.
@GetMapping("/customers/{id}")
public  ResponseEntity<Customer> getCustomerById(@PathVariable(value = "id") Long cId) {

    Customer  c = customerRepository.findOne(cId);
    if(c == null) {
        return  ResponseEntity.notFound().build();
    }
        return  ResponseEntity.ok().body(c);
}
In the method body we simply use .findOne(id) method of the CustomerRepository to retrieve a customer by its id from the database.
Update a Customer by Id
To update a customer by id we create the PUT API endpoint using the @PutMapping("/customers/{id}") annotation:
@PutMapping("/customers/{id}")
public  ResponseEntity<Customer> updateCustomer(@PathVariable(value = "id") Long cId,

@Valid  @RequestBody  Customer customerDetails) {

    Customer  customer = customerRepository.findOne(cId);

    if(customer == null) {

        return  customerRepository.notFound().build();

    }

    customer.setFirstName(customerDetails.getFirstName());
    customer.setLastName(customerDetails.getLastName());
    customer.setDescription(customerDetails.getDescription());
    Customer  updatedC = customerRepository.save(customer);

    return  ResponseEntity.ok(updatedC);

}
Delete a Customer by Id
To create a DELETE API endpoint, we use the @DeleteMapping("/customers/{id}"):
@DeleteMapping("/customers/{id}")
public  ResponseEntity<Customer> deleteCustomer(@PathVariable(value = "id") Long customerId) {

    Customer  customer = customerRepository.findOne(customerId);

        if(customer == null) {

            return  ResponseEntity.notFound().build();

        }
        customerRepository.delete(customer);

        return  ResponseEntity.ok().build();
}
Conclusion
After implementing our API endpoints, we can now start our application. So head over to your project's root folder then run the following command from your terminal:
$ gradle bootRun
Your REST API will be available at localhost:8080/api/customers.
In this tutorial, we've used Java 13, Spring 5, Spring Boot 2.2 and JPA to create a REST API web application. In the next tutorial we'll learn how to consume this API from an Angular 8 front-end. Stay tunned!
-
Date:


