Upgrade to Angular 17

Updating Angular CLI to v17 and upgrading your project to Angular 17 framework from previous versions (Angular 16) is easier than ever before, thanks to all the work that has been done in version 17 and the ng update command which allows you to update specific versions and dependencies.
How to Update to Angular 17 by Example?
In this tutorial, you'll learn about the required steps that you need to follow to appropriately migrate your existing apps to Angular 17 — The latest version of the framework at the time of this writing.
We have two ways to update your application to the latest version:
- Use the
ng updatecommand of the Angular CLI - Use
nx migatecommand of the Nx monorepo tool
You can read about the migrate command here.
Angular 17 release
Angular 17 is due to be released in November with many new features including a new syntax for control flow in the template and signal comoponents.
What is the ng update Command?
Ng update is a command available in Angular CLI which is used to update your application and its dependencies. You can use it to update all packages in the package.json file via the --all option that could take true or false or specific versions via the --packages option. You can see all the available commands from the official docs.
1. Update your Angular CLI.
npm install -g @angular/cli@17
or
yarn add -g @angular/cli@17
2. Update your Angular core packages.
ng update @angular/core
This will update all of your Angular core packages to the latest version, including @angular/core, @angular/compiler, and @angular/platform-browser.
3. Update your other Angular packages.
If you are using any other Angular packages, such as @angular/material, you will need to update them individually. You can do this using the following command:
ng update @angular/material
4. Review the Angular update guide.
The Angular update guide includes a detailed list of all the changes that have been made in each new version of Angular. It is important to review this guide to make sure that you are aware of all the changes that have been made and that you are prepared to make any necessary changes to your code.
5. Test your application.
Once you have updated all of your Angular packages, be sure to test your application thoroughly to make sure that everything is working as expected.
Example
To upgrade an existing Angular application to Angular 17, you would follow these steps:
1. Update your Angular CLI
npm install -g @angular/cli@17
2. Update your Angular core packages
ng update @angular/core
3. Update your other Angular packages
If you are using any other Angular packages, such as @angular/material, you would need to update them individually. For example, to update @angular/material, you would run the following command:
ng update @angular/material
4. Review the Angular update guide
You can find the Angular update guide at https://update.angular.io/: https://update.angular.io/.
5. Test your application
Once you have updated all of your Angular packages, be sure to test your application thoroughly to make sure that everything is working as expected.
Tips
- If you are upgrading from a major version of Angular to another, it is recommended to first upgrade to a minor version in between. This will help to reduce the risk of breaking changes.
- Before upgrading your application, be sure to back up your code and database.
- If you are using any third-party libraries, check to see if they are compatible with Angular 17.
- If you encounter any problems during the upgrade process, be sure to consult the Angular documentation and community forums for help.
Updating Angular to v17
In this tutorial, we'll see step by step how to upgrade an example Angular 13 project to the latest Angular 17 version.
Why Upgrade to Angular 17
Why upgrading to Angular 17?
Angular 17 comes with new features that makes it the greatest release so far that provides increased performance and smaller bundles but also many new features that you can check from here.
Also updating your project to the latest version provides bug fixes and reduces security issues.
Upgrading from Angular 16 to v17
You can run the following commands from an angular 16 project to upgrade to the latest version v17:
$ ng update @angular/core@17 @angular/cli@17
Steps for Upgrading from Angular 7 to Angular 9
We have previously started a tutorial series for building a portfolio web application with Angular 7 and Firebase. Before we continue building our app, let's upgrade it to Angular 9.
Step 1 - Cloning the Project from GitHub
Let's start with the first step in which we'll clone the Angular 7 project from the GitHub repository.
Open a new command-line interface and run the following command:
$ git clone https://github.com/techiediaries/angular-portfolio
Next, navigate to your project's folder and install the project's dependencies using the following commands:
$ cd angular-portfolio
$ npm install
Step 2 - Identifying the Used Angular Version in The Project
Head back to your command-line interface and run the following command:
$ ng version
You'll get the following output:
Your global Angular CLI version (9.0.0-rc.2) is greater than your local
version (7.1.4). The local Angular CLI version is used.

To disable this warning use "ng config -g cli.warnings.versionMismatch false".

Angular CLI: 7.1.4
Node: 10.16.3
OS: win32 ia32
Angular: 7.1.4
... animations, cli, common, compiler, compiler-cli, core, forms
... language-service, platform-browser, platform-browser-dynamic
... router

Package                           Version
-----------------------------------------------------------
@angular-devkit/architect         0.11.4
@angular-devkit/build-angular     0.11.4
@angular-devkit/build-optimizer   0.11.4
@angular-devkit/build-webpack     0.11.4
@angular-devkit/core              7.1.4
@angular-devkit/schematics        7.1.4
@ngtools/webpack                  7.1.4
@schematics/angular               7.1.4
@schematics/update                0.11.4
rxjs                              6.3.3
typescript                        3.1.6
webpack                           4.23.1
This indicates that the Angular CLI v7.1.4 is used in our project and that the local version is used instead of the global version (v9.0.0-rc.2) that we already have installed on our system.
Step 3 - Identifying how To Upgrade
The Angular team made upgrading much easier than before. You can get the commands that you need to run to update your project from an Angular version to another one by using the Angular Update Guide.
Head to that interactive guide and specify 7.1.4 as the current version and the target version which is v9.0.0-rc.2 and click the Show me how to update! button
After specifying the versions, you'll get a warning saying We do not recommend moving across multiple major versions. since we are moving from v7 to v9:
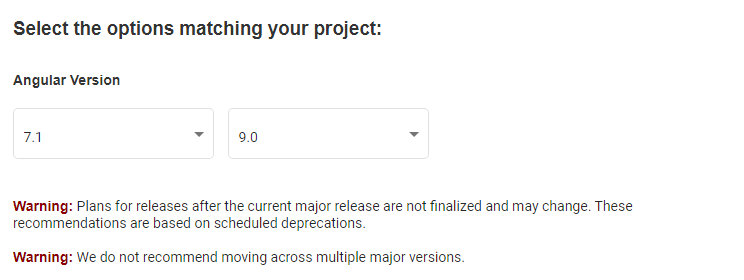
We'll take this warning into consideration and we'll first upgrade our project from Angular 7 to Angular 8.
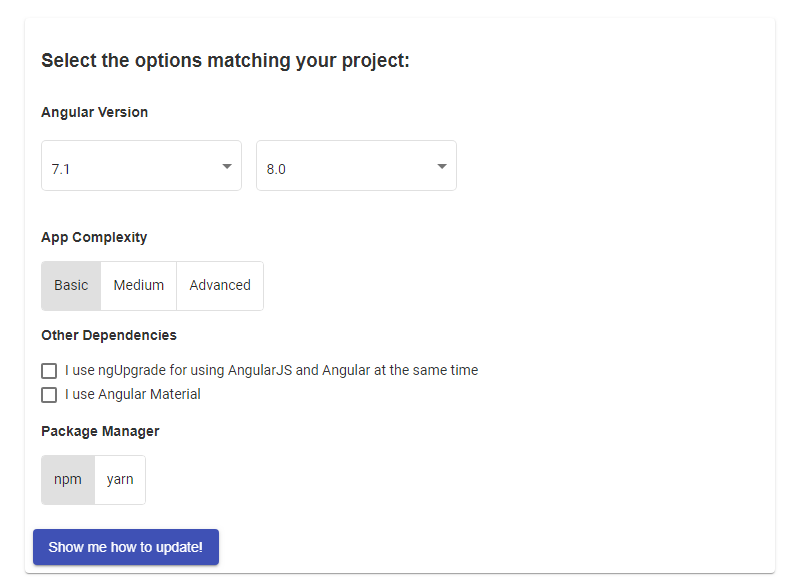
So change the target version to v8.0
It will show you a list of the things you need to do:
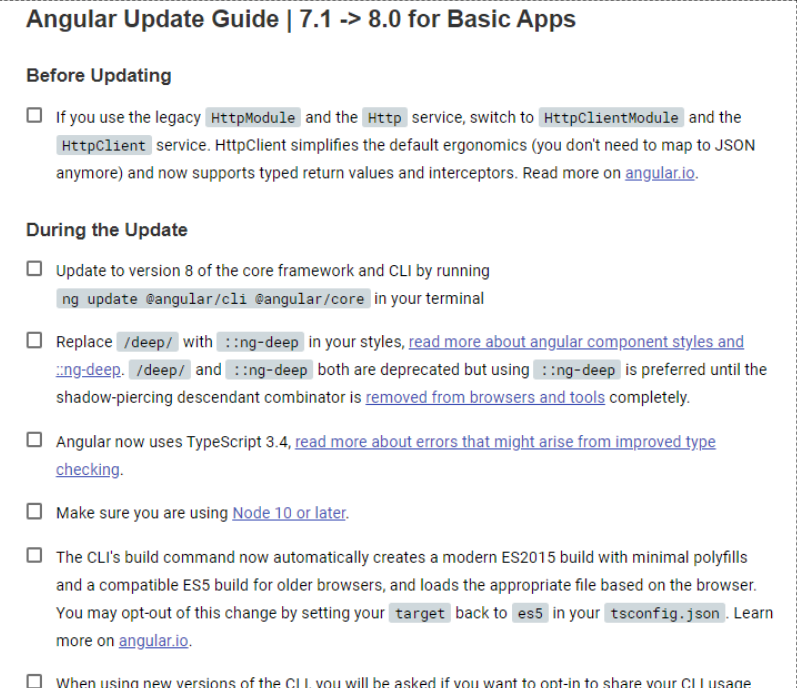
Note: The tool indicates that if we are using the legacy
HttpModuleand theHttpservice in our project, we need to switch toHttpClientModuleand theHttpClientservice but we are not making use ofHttpin this project.
Step 4 - Updating from Angular 7 to v8
Angular 8 uses TypeScript 3.4, read more about errors that might arise from improved type checking.
Make sure you are using Node 10 or later.
In you command-line interface run the following command:
$ ng update
This will analyze the package.json file of your project and give you a list of packages to update with the required commands:
    We analyzed your package.json, there are some packages to update:

      Name                               Version                  Command to update
     --------------------------------------------------------------------------------
      @angular/cli                       7.1.4 -> 8.3.19          ng update @angular/cli
      @angular/core                      7.1.4 -> 8.2.14          ng update @angular/core
      rxjs                               6.3.3 -> 6.5.3           ng update rxjs


    There might be additional packages that are outdated.
    Run "ng update --all" to try to update all at the same time.
So, let's start by updating the core framework and the CLI to v8.2.14 and v8.3.19 respectively using the following command:
$ ng update @angular/cli @angular/core
This will update the core framework and CLI to Angular 8:
    Updating package.json with dependency @angular/compiler @ "8.2.14" (was "7.1.4")...
    Updating package.json with dependency @angular/language-service @ "8.2.14" (was "7.1.4")...
    Updating package.json with dependency @angular/forms @ "8.2.14" (was "7.1.4")...
    Updating package.json with dependency @angular/platform-browser @ "8.2.14" (was "7.1.4")...
    Updating package.json with dependency @angular/platform-browser-dynamic @ "8.2.14" (was "7.1.4")...
    Updating package.json with dependency @angular/cli @ "8.3.19" (was "7.1.4")...
    Updating package.json with dependency @angular/animations @ "8.2.14" (was "7.1.4")...
    Updating package.json with dependency @angular/common @ "8.2.14" (was "7.1.4")...
    Updating package.json with dependency zone.js @ "0.9.1" (was "0.8.26")...
    Updating package.json with dependency rxjs @ "6.5.3" (was "6.3.3")...
    Updating package.json with dependency @angular/router @ "8.2.14" (was "7.1.4")...
    Updating package.json with dependency @angular/core @ "8.2.14" (was "7.1.4")...
    Updating package.json with dependency @angular/compiler-cli @ "8.2.14" (was "7.1.4")...
    Updating package.json with dependency typescript @ "3.5.3" (was "3.1.6")...
Note: On Windows I had to run
npm installafterng update @angular/cli @angular/coreto install the new versions of the dependencies.
Now, let's check the new version of Angular using the following command:
$ ng --version
This is the output of the command:
Angular CLI: 8.3.19
Node: 10.16.3
OS: win32 ia32
Angular: 8.2.14
... animations, common, compiler, compiler-cli, core, forms
... language-service, platform-browser, platform-browser-dynamic
... router

Package                           Version
-----------------------------------------------------------
@angular-devkit/architect         0.11.4
@angular-devkit/build-angular     0.11.4
@angular-devkit/build-optimizer   0.11.4
@angular-devkit/build-webpack     0.11.4
@angular-devkit/core              7.1.4
@angular-devkit/schematics        8.3.19
@angular/cli                      8.3.19
@ngtools/webpack                  7.1.4
@schematics/angular               8.3.19
@schematics/update                0.803.19
rxjs                              6.5.3
typescript                        3.5.3
webpack                           4.23.1
You can see that we have successfully updated Angular CLI to v8.3.19, Angular to v8.2.14 and different core packages. Even TypeScript is bumped to v3.5.3.
Step 5 - Updating from Angular v8.2.3 to The Latest Angular 9 Pre-Release Version
After updating our project to Angular 8, we will proceed to update it to the latest Angular 9 version.
Head back to your terminal and run the ng update command again. You will get the following output:
Using package manager: 'npm'
Collecting installed dependencies...
Found 32 dependencies.
    We analyzed your package.json and everything seems to be in order. Good work!
This is because Angular 9 is still in RC version ie in pre release but the tool gives only stable versions.
If you want to get pre-release versions, you need to use the --next flag as follows:
$ ng update --next
And this is the output:
...
Name                               Version                  Command to update--------------------------------------------------------------------------------
@angular/cli                       8.3.19 -> 9.0.0-rc.2     ng update @angular/cli --next
@angular/core                      8.2.14 -> 9.0.0-rc.2     ng update @angular/core --next
Next, you can update to the latest versions of the CLI and core framework using the following command:
$ ng update @angular/cli @angular/core --next
In my case, I had an error saying Repository is not clean. Please commit or stash any changes before updating.
It seems this is a kind of abug that you can solve using the --allow-dirty flag:
$ ng update @angular/cli @angular/core --next --allow-dirty
Our project is successfully updated to Angular 9. This is the output of the command:
Using package manager: 'npm'
Collecting installed dependencies...
Found 32 dependencies.
Fetching dependency metadata from registry...
    Updating package.json with dependency @angular/cli @ "9.0.0-rc.2" (was "8.3.19")...
    Updating package.json with dependency @angular/core @ "9.0.0-rc.2" (was "8.2.14")...
    Updating package.json with dependency @angular-devkit/build-angular @ "0.900.0-rc.2" (was "0.11.4")...
    Updating package.json with dependency @angular/compiler-cli @ "9.0.0-rc.2" (was "8.2.14")...
    Updating package.json with dependency @angular/animations @ "9.0.0-rc.2" (was "8.2.14")...
    Updating package.json with dependency @angular/language-service @ "9.0.0-rc.2" (was "8.2.14")...
    Updating package.json with dependency tslib @ "1.10.0" (was "1.9.3")...
    Updating package.json with dependency @angular/forms @ "9.0.0-rc.2" (was "8.2.14")...
    Updating package.json with dependency @angular/platform-browser @ "9.0.0-rc.2" (was "8.2.14")...
    Updating package.json with dependency @angular/platform-browser-dynamic @ "9.0.0-rc.2" (was "8.2.14")...

    Updating package.json with dependency @angular/common @ "9.0.0-rc.2" (was "8.2.14")...
    Updating package.json with dependency zone.js @ "0.10.2" (was "0.9.1")...
    Updating package.json with dependency @angular/router @ "9.0.0-rc.2" (was "8.2.14")...
    Updating package.json with dependency @angular/compiler @ "9.0.0-rc.2" (was "8.2.14")...
    Updating package.json with dependency typescript @ "3.6.4" (was "3.5.3")...
UPDATE package.json (1400 bytes)
√ Packages installed successfully.
** Executing migrations of package '@angular/cli' **

> Angular Workspace migration.
  Update an Angular CLI workspace to version 9.
UPDATE angular.json (4186 bytes)
UPDATE tsconfig.json (457 bytes)
UPDATE src/tsconfig.app.json (170 bytes)
UPDATE src/tsconfig.spec.json (274 bytes)
UPDATE package.json (1403 bytes)
√ Packages installed successfully.
  Migration completed.

> Lazy loading syntax migration.
  Update lazy loading syntax to use dynamic imports.
  Migration completed.

** Executing migrations of package '@angular/core' **

> Static flag migration.
  Removes the `static` flag from dynamic queries.
  As of Angular 9, the "static" flag defaults to false and is no longer required for your view and content q
ueries.
  Read more about this here: https://v9.angular.io/guide/migration-dynamic-flag
  Migration completed.

> Missing @Injectable migration.
  In Angular 9, enforcement of @Injectable decorators for DI is a bit stricter.
  Read more about this here: https://v9.angular.io/guide/migration-injectable
  Migration completed.

> ModuleWithProviders migration.
  In Angular 9, the ModuleWithProviders type without a generic has been deprecated.
  This migration adds the generic where it is missing.
  Read more about this here: https://v9.angular.io/guide/migration-module-with-providers
  Migration completed.

> Renderer to Renderer2 migration.
  As of Angular 9, the Renderer class is no longer available.
  Renderer2 should be used instead.
  Read more about this here: https://v9.angular.io/guide/migration-renderer
  Migration completed.

> Undecorated classes with decorated fields migration.
  As of Angular 9, it is no longer supported to have Angular field decorators on a class that does not have
an Angular decorator.
  Read more about this here: https://v9.angular.io/guide/migration-undecorated-classes
  Migration completed.

> Undecorated classes with DI migration.
  As of Angular 9, it is no longer supported to use Angular DI on a class that does not have an Angular deco
rator.
  Read more about this here: https://v9.angular.io/guide/migration-undecorated-classes
  Migration completed.


Your project has been updated to Angular version 9!
For more info, please see: https://v9.angular.io/guide/updating-to-version-9
Step 6 - Serving the App
You can see if your application still works by simply serving it:
$ ng serve
In this section, we've seen step by step how to update our old Angular 7 project to Angular 8 and finally to Angular 9.
Updating Angular CLI to v8
Updating Angular CLI can be made by simply installing the latest version from npm using the following command in your terminal:
$ npm install -g @angular/cli
Make sure you have the latest version of Node (12+) and npm installed in your system. You can refer to the official website to download a version compatible with your operating system.
You might need to add sudo before your command in debian based systems and macOS in order to install Angular CLI globally in your system or run your command prompt as administrator in Windows. If you get any EACCESS permission errors, you can also just fix your npm permissions or use NVM (Node Version Manager) to install your Node version which takes care of automatically resolving these issues.
How to Upgrade to Angular 8?
For simple use cases and thanks to the work done in Angular 8, you can upgrade to the latest release using one command:
$ ng update @angular/cli @angular/core
After running this command, the lazy loaded routes will be automatically migrated to the new import syntax which is standard compliant and brings Angular close to the open web platform.
You also need to be aware of the following issues when upgrading your project:
Angular 8 makes use of the latest TypeScript 3.4, so even if the upgrade process completes with success you might have some syntax errors that may be due to the better type inference system used by the latest version which detects new potential typing issues but in the end this will improve your code quality and helps you avoid bugs in the future. You can see the new features of TypeScript 3.4 from the official docs.
You need to have Node.js 12+. Simply run
node -vto verify your Node version. You can install the latest version from the official website.
The New Import Syntax of Lazy Loaded Routes
If you have worked with lazy loaded routes in Angular then you have certainly used code similar to the following:
const routes: Routes = [
  {
    path: 'product-list',
    loadChildren: './product-list/product-list.module#ProductListModule',
  }
];
We have a route with a product-list path which makes use of the loadChildren property to lazy-load the product list module. We use a magic string which refers to the module and which is used by Angular CLI to apply code splitting and load the chunck at runtime. If you put a wrong path in this magic string, Angular will not detect the issue right away.
Now with Angular 8, there is a better alternative which is using the standard compliant import() statement which will allow you to detect any issues ahead of time:
const routes: Routes = [
  {
    path: 'product-list',
    loadChildren: () => import('./product-list/product-list.module').then(m => m.ProductListModule)
  }
];
Don't worry about making the changes manually since when updating via the Angular CLI, it will automatically replace your existing loadChildren with the new import() syntax.
Breaking Changes in @ViewChild and @ContentChild
If you are using @ViewChild and @ContentChild in your code, you need to be aware of a breaking change related to static query migrations:
This was unavoidable but the CLI will notify you when you are upgrading to Angular 8. The notification says that With Angular version 8, developers need to explicitly specify the timing of ViewChild and ContentChild queries.
During the update, if Angular CLI fails to automatically to figure out whether to use the static or dynamic flag in the query, it will warn you and you need to go and manually apply the correct timing in your code. The shematic will also add a comment saying /* TODO: add static flag */ in your code.
According to the docs:
If you see this comment, it means that the schematic couldn't statically figure out the correct flag. In this case, you'll have to add the correct flag based on your application's behavior. For example:
@ViewChild('foo', {static: false}) foo: ElementRef;
In the template you need to have a DOM element identified with foo:
<div foo></div>
Now, how you can choose the correct flag to use, again according to the docs.
Most applications will want to use
{static: false}for the same reason. This setting will ensure query matches that are dependent on binding resolution (e.g. results inside *ngIfs or *ngFors) will be found by the query.There are rarer cases where
{static: true}flag might be necessary (see answer here).
What About Angular Material v8
If your project makes use of Angular Material you also need to upgrade the package to v8 using the following command:
$ ng update @angular/material
This command will update the package and automatically change the imports statements of your Angular Material components to the specific component paths instead of directly importing from the @angular/material entry-point which is now deprecated.
According to the release notes for v8:
Importing directly from the root @angular/material entry-point is deprecated. You should instead import from specific entry-points, e.g. @angular/material/button. This aligns with @angular/cdk, makes clear where symbols originate, and helps safeguard against including unused code. The deprecated style will be removed in Angular v9.
Angular CLI users can use ng update @angular/material to automatically migrate imports to the new style.
Other Deprecations
You can also head to the deprecation guide on the official website. If you still have issues, you can open an issue in the GitHub repository of Angular CLI or the repository of Angular if it’s related to the framework.
You can also check out update.angular.io for more details.
How to Upgrade to Angular 7
You can find more details about the update process from the update.angular.io official website.
Thanks to all the improvements done in Angular 6, it's now easier than ever to update to the latest version.
In most cases, you can update to v7 by running one simple command:
$ ng update @angular/cli @angular/core
If you still need more details on the process, follow the next sections:
Updating from Angular 6 to Angular 7 (Basic Apps)
if your project is basic, you can simply try the following steps:
- First, you need to remove the deprecated features of RxJS 6 using the auto-update rules from rxjs-tslint. You simply need to install the tool globally using the
npm install -g rxjs-tslintcommand then run therxjs-5-to-6-migrate -p src/tsconfig.app.jsonfrom the root of your project. Once it's done you can remove therxjs-compatlibrary. - Finally you simply have to run the
ng update @angular/cli @angular/corecommand to update to v7 the core framework and the CLI.
Updating Advanced Apps
If your project uses advanced APIs like HTTP, you need to replace the old HttpModule and the Http service (which was deprecated in v6) with the new HttpClientModule and the HttpClient service that brings a lot of new powerful features.
Also if your applicaton makes use of the Angular Service worker, you need to migrate any versionedFiles to the files array.
Aside from what's stated above, you don't need to perform any changes in your project to migrate from v6.1 to v7.
Instructions for Old Angular Versions
Throughout this tutorial guide, you'll learn by example how you can update or migrate your Angular 5 project generated by Angular CLI to use Angular 6 (The latest version) and Angular CLI 6. We'll take you step by step to upgrade your existing Angular 5 projects (can be also applied to Angular 2 or Angular 4) to use the latest Angular features and dependencies.
In nutshell, these are the steps:
- Update your Node.js to version 8 or later required by Angular 6
- Update Http to HttpClient introduced in Angular 4.3+
- Update animations import from @angular/core to @angular/animations
- Update or install the Angular CLI to version 6 globally and locally per project
- Displays packages that need updating using
ng update - Update core packages using
ng update @angular/core - Update RxJS package using
ng update rxjs - Update Angular Material, if used, using
ng update @angular/material
Requirements
Before you can update/upgrade your Angular 5 project, make sure you have the following requirements:
- NodeJS 8+ installed on your machine
- You are using the new Angular 4.3+ HttpClient and HttpClientModule. If that's not the case then don't worry the process is simple and transparent just replace HttpModule with HttpClientModule and use Http with HttpClient
- You are importing animations from @angular/animations instead of @angular/core
Installing or Updating the Angular CLI to Version 6
Updating the Angular CLI is easy and it's a matter of installing the latest version from npm using the following command:
npm install -g @angular/cli
You may need to add sudo depending on your npm configuration.
Also it goes without saying that you need Node.js 8+ and NPM installed on your system to be able to install and run Angular CLI 6.
Updating Angular 5 CLI to Version 6 (Method 2)
You can also uninstall the previous Angular CLI 5 version before you install the latest version using the following command:
npm uninstall -g angular-cli
npm cache clean
Next run the npm install command globally:
npm install -g @angular/cli
Upgrading Angular 4|5 Projects
First, start by installing the Angular CLI 6 locally using the following command (Make sure you are inside your project's root folder):
npm install @angular/cli@latest
Updating Configuration Files
There are many differences between Angular 4|5 and Angular 6 such as
- Angular 6 uses
angular.jsoninstead ofangular-cli.json. - Different versions of dependencies in
package.jsonetc.
You can update different configuration files automatically by running the following command from the project's root folder:
ng update @angular/cli
Discovering Packages to Update
Angular CLI has a new utility that allows you to automatcially analyze your project's package.json file and displays dependencies that need to be updated.
Using you terminal from the root folder of your Angular 5 project run the following command:
ng update
This is an example output from this command:

Upgrading Core Packages to Angular 6
Now you need to update the core packages/dependencies to Angular 6. Simply run the following command:
ng update @angular/core
Upgrading RxJS
You can update RxJS using the ng update command:
ng update rxjs
Upgrading Angular 2 Projects
Now how about existing Angular 2 projects, generated using the Angular CLI?
You can easily update them to use latest dependencies by following these instructions:
First check your versions of installed Angular CLI and other dependencies with:
ng --version
In my case, I'm getting this output:
    @angular/cli: 1.0.0
    node: 7.9.0
    os: linux ia32
    @angular/animations: 4.1.2
    @angular/common: 4.1.2
    @angular/compiler: 4.1.2
    @angular/core: 4.1.2
    @angular/forms: 4.1.2
    @angular/http: 4.1.2
    @angular/platform-browser: 4.1.2
    @angular/platform-browser-dynamic: 4.1.2
    @angular/platform-server: 4.1.2
    @angular/router: 4.1.2
    @angular/cli: 1.0.0
    @angular/compiler-cli: 4.1.2
Since we have installed the latest Angular CLI globally. If you try to serve your project you'll be getting a warning of version mismatch:
Your global Angular CLI version (1.2.5) is greater than your local
version (1.0.0). The local Angular CLI version is used.
To disable this warning use "ng set --global warnings.versionMismatch=false".
Next open your project package.json file then change the Angular CLI version: You can check the npm info page for Angular CLI package from this link to find out the latest version.
"@angular/cli": "1.2.5"
Next, delete your project node_modules folder and run the following command:
npm install
You don't need to change the versions of the other dependencies, the Angular CLI will take care of fetching latest versions.
Now you can check again for installed versions with:
ng --version
In my case I'm getting this output:
    @angular/cli: 1.2.5
    node: 7.9.0
    os: linux ia32
    @angular/animations: 4.3.1
    @angular/common: 4.3.1
    @angular/compiler: 4.3.1
    @angular/core: 4.3.1
    @angular/forms: 4.3.1
    @angular/http: 4.3.1
    @angular/platform-browser: 4.3.1
    @angular/platform-browser-dynamic: 4.3.1
    @angular/platform-server: 4.3.1
    @angular/router: 4.3.1
    @angular/cli: 1.2.5
    @angular/compiler-cli: 4.3.1
As you can see Angular 4.3.1 is installed.
Conclusion
In this tutorial, we've seen step by step how to ng update the Angular CLI to version 6, how to upgrade an existing Angular 2 to Angular 4 and An Angular 4|5 to Angular 6.
This tutorial is also updated for Angular 7.
- Author: Ahmed Bouchefra Follow @ahmedbouchefra
-
Date:
Related posts
Angular Signals & Forms Angular 16 Injecting Service without Constructor Angular @Input View Transitions API in angular 17 tutorial View Transitions API in angular 17 tutorial Dynamically loading Angular components Angular 17 AfterRender & afterNextRender Angular Standalone Component Routing Angular Standalone Components vs. Modules Angular 17 resolvers Angular 17 Error Handling: What's New and How to Implement It Angular Signals in templates Angular Signals and HttpClient Angular Signals CRUD step by step Angular Injection Context: What is it and how to use it Angular Injection Context: What is it and how to use it How to Avoid Duplicate HTTP Requests Angular 17 — Deferred Loading Using Defer Block Asynchronous pipes in Angular: A Deeper dive Top 5 Angular Carousel Components of 2023 Angular 17 Material Multi Select Dropdown with Search Angular 17: Enhanced Control Flow Simplified with Examples Angular 17 Material Autocomplete Multiselect Step-by-Step Angular 17 Material Autocomplete Get Selected Value Example Angular 17 Material Alert Message Step by Step A Step-by-Step Guide to Using RxJS combineLatestWith RxJS Buffer: An Effective Tool for Data Grouping and Filtering Angular 14+ standalone components Angular v17 tutorial Angular 17 CRUD Tutorial: Consume a CRUD REST API Upgrade to Angular 17 Angular 17 standalone component Add Bootstrap 5 to Angular 17 with example & tutorial Angular 17 due date and new features Angular 17 Signals ExplainedHands-on Angular eBook
Subscribe to our Angular newsletter and get our hands-on Angular book for free!